Thinking about window tinting? Here’s what you need to know:
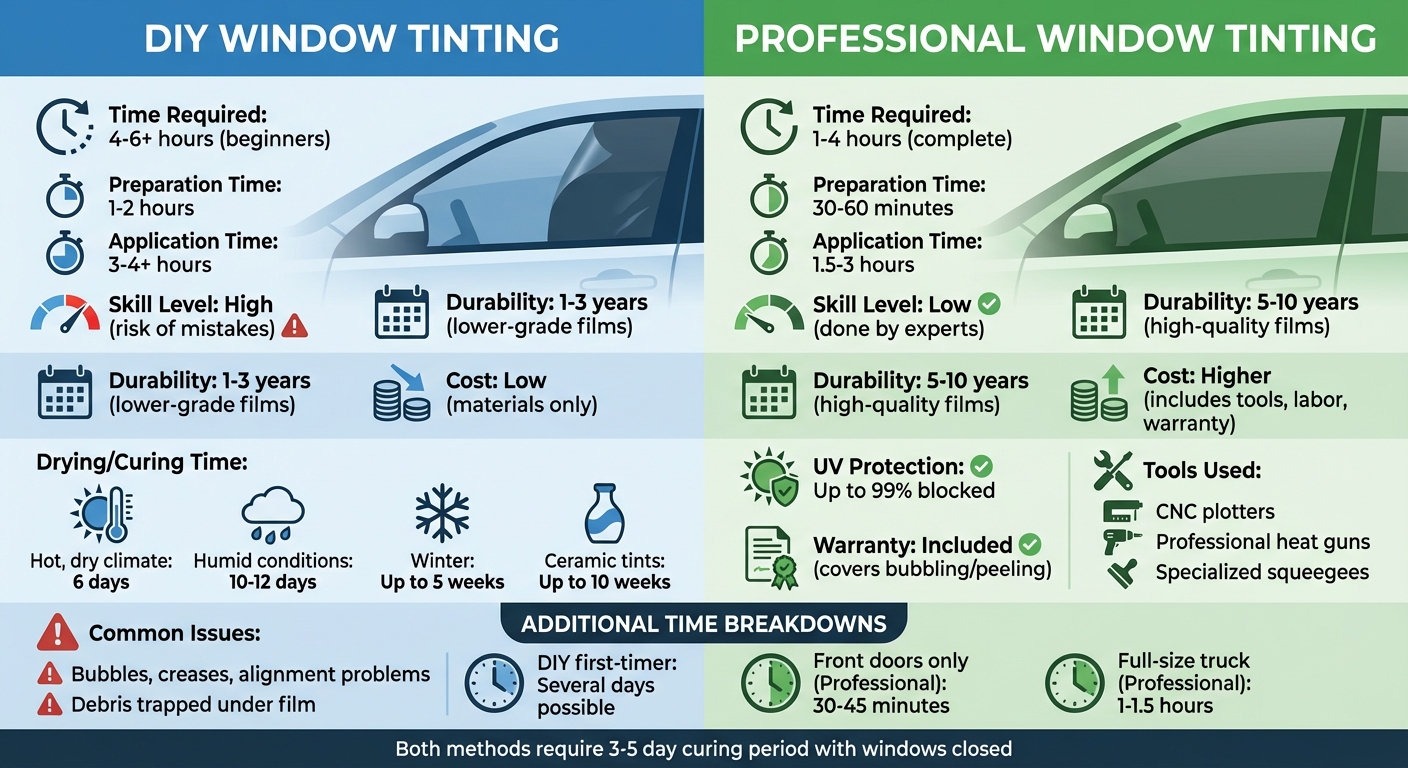
DIY window tinting can take 4–6+ hours for beginners and comes with challenges like bubbles, creases, and alignment issues. Preparation and application are time-consuming, and mistakes often require starting over. Drying times vary based on climate, with some tints taking up to 10 weeks to cure.
Professional window tinting is faster, taking 1–4 hours. Pros use advanced tools like CNC plotters and heat guns, ensuring precise cuts and smooth finishes. They work in clean, controlled environments, reducing errors. The results are durable, lasting 5–10 years, and often include warranties.
Key takeaway: DIY saves money but requires time, effort, and patience. Professional tinting delivers better results quickly and with less hassle, making it ideal for high-quality finishes or newer vehicles.
Quick Comparison
Method
Time (Prep + Install)
Skill Needed
Durability
Cost
DIY (Beginner)
4–6+ hours
High (risk of mistakes)
1–3 years (lower-grade films)
Low (cost of materials)
Professional
1–4 hours
Low (done by experts)
5–10 years (high-quality films)
Higher (includes tools, labor, warranty)
If you value speed, quality, and durability, professional tinting is the smarter choice. But if you enjoy hands-on projects and have the time, DIY might be worth exploring.
DIY vs Professional Window Tinting: Time, Cost, and Durability Comparison
DIY Window Tinting: Time Requirements and Difficulties
Preparation Steps and Time Needed
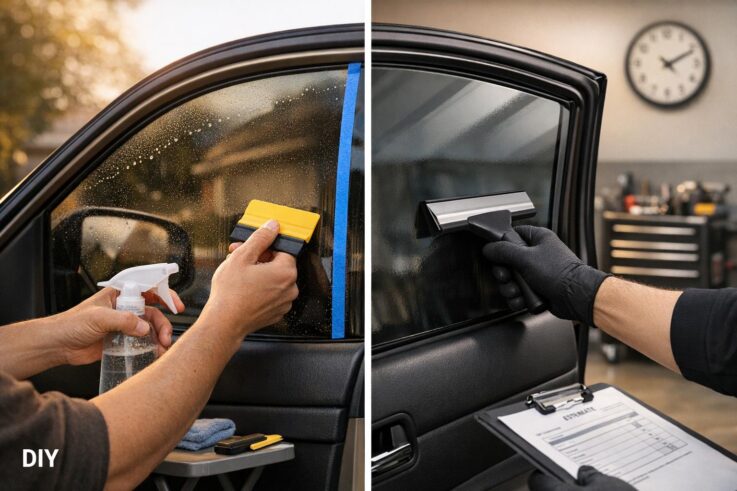
Start by thoroughly cleaning your workspace. Sweep or vacuum the area, then give the dust some time to settle before proceeding. After that, wash both sides of your car windows using a soap and water mixture to remove any grime, dust, or leftover adhesive that could interfere with the tinting film’s adhesion.
Once the windows are clean, measure each one precisely and cut the tinting film from a master roll. Use a heat gun to shrink and shape the film so it fits the contours of the glass. Finally, place the trimmed film on a peel board, which helps prevent peeling when the windows are rolled up or down. If it’s your first time tackling this project, these preparation steps can take 1 to 2 hours. Completing the entire DIY installation, however, can take anywhere from 4 to 6 hours, depending on your skill level. The application phase, though, comes with its own set of challenges.
Applying the Film and Common Mistakes
Applying the tinting film can be tricky. Issues like debris, air bubbles, alignment problems, and trimming mistakes are common. Debris trapped under the film creates permanent bumps, while air bubbles from poor squeegee technique are nearly impossible to fix once the adhesive sets. Misaligned film can leave gaps or lead to peeling, and trimming errors might damage the window glass or weather stripping.
Curved windows, especially rear glass, add another layer of difficulty. As Greg Poggiali explains:
The rear glass… is the Bowser of window tinting. The glass is curved in multiple directions and covered in delicate defroster lines.
These challenges can significantly extend the time needed, especially if mistakes force you to reapply or start over.
Drying Time and Weather Conditions
After application, the tint needs time to cure. During this period, it’s crucial to keep the windows rolled up for at least 48 to 72 hours to allow the adhesive to set properly. In hot, dry climates, the tint typically dries within 6 days. However, in humid conditions, drying can take 10 to 12 days. Winter weather slows the process even more, with drying times stretching up to 5 weeks. Ceramic tints, in particular, may require as long as 10 weeks to fully cure. Additionally, it’s best to wait at least 7 days before cleaning the inside of the tinted windows. These varying drying times mean a DIY tinting project involves more than just the hours spent on installation – it’s a longer-term commitment.
sbb-itb-74b4b25
Professional Window Tinting: Faster Installation
Tools and Techniques That Save Time
Professional window tinting is completed in just 2 to 4 hours, a fraction of the time it takes for DIY projects. This speed comes from using advanced tools and techniques. For instance, professionals rely on Computer Numerical Control (CNC) plotters, which cut the film with pinpoint accuracy. These plotters use precise measurements from extensive databases, eliminating guesswork and minimizing the risk of damaging the glass or weather stripping.
Another key tool is the high-powered heat gun, which allows professionals to heat-form and shrink the film to fit curved windows seamlessly. This process ensures a perfect fit, especially for rear windows with complex curves, avoiding the creases and bubbles that are common with DIY attempts. As Greg Poggiali from Jalopnik explains:
A pro works in a clean shop with a computer numerical control plotter, every squeegee they might need, even the ability to use water treatment to ensure the final application is perfect.
Additionally, professional-grade squeegees and hard cards help extract water and secure the film’s adhesive, even in tight corners, ensuring a smooth and durable finish.
Clean Workspaces for Better Results
The professional environment plays a significant role in achieving quick and flawless results. In a dust-free, climate-controlled workspace, installers avoid common issues like dust or debris getting trapped under the film. This setup ensures a clean application, preventing bumps that would require a complete redo.
Enhanced lighting and water treatment systems further contribute to the efficiency. Professionals follow a systematic cleaning process to remove all contaminants before applying the film, which eliminates the need for time-consuming reapplications. Auto Film Solutions highlights this advantage:
All of the equipment used in a professional shop makes the installation faster and cleaner, so you get flawless looking window tint in a short amount of time.
DIY VS PRO | BEGINNER vs PRO Window Tint Install
Time Comparison: DIY vs Professional
When it comes to preparation and application times, it’s easy to see why many people lean toward professional services instead of tackling a DIY project. Professional installations are noticeably quicker. While professionals can generally finish the job in 2 to 4 hours, a DIY project often takes 4 to 6 hours – and that’s for someone with experience. If you’re a first-timer, you might find yourself spending several days on the task.
Here’s a quick breakdown of how the times compare:
Method
Preparation Time
Application Time
Total Completion Time
DIY (First-timer)
1–2 hours
3–4+ hours
4–6+ hours
Professional
30–60 minutes
1.5–3 hours
2–4 hours
Professional (Front Doors Only)
10–15 minutes
20–30 minutes
30–45 minutes
Professional (Full-Size Truck)
20–30 minutes
40–60 minutes
1–1.5 hours
One of the biggest risks with DIY is mistakes. Issues like bubbles, creases, or misalignment can mean starting over – or worse, buying new materials. What starts as a weekend project can easily stretch into days of frustration.
What Affects Installation Time
While the table above gives a general idea of timing, several factors can influence how long the process actually takes. Here are some of the key variables:
Skill Level: Professionals have mastered their craft through repeated practice, allowing them to handle tricky areas like curves and corners with ease. If you’re new to the process, expect to spend extra time learning how to position the film correctly.
Tools: Professionals use specialized tools like precision cutters and advanced heat guns to get the job done quickly and efficiently. DIYers usually rely on basic tools, such as standard heat guns and utility knives, which can slow things down.
Vehicle Design: The type of vehicle you’re working on matters. For example, full-sized trucks are generally quicker to tint than sedans with complex rear windows. If your vehicle has old tint that needs to be removed, that can add anywhere from 30 minutes to several hours to the process.
Work Environment: Professionals work in controlled settings with optimal lighting, consistent temperatures, and no dust – all of which help the film adhere properly. On the other hand, DIYers working in home garages or driveways might have to deal with wind, dust, or fluctuating temperatures, which can lead to delays and even compromise the quality of the installation.
These factors make it clear why many vehicle owners choose professional services when they want both speed and high-quality results.
When Professional Tinting Makes Sense
Quality and Durability
If you have a newer or high-end vehicle, opting for professional window tinting is the smarter choice. Professionally installed tint can last anywhere from 5 to 10 years with proper care, while DIY options often fade or deteriorate within 1 to 3 years. The difference lies in the materials and techniques used. Professional shops typically rely on high-quality ceramic or carbon films, which block up to 99% of harmful UV rays. In contrast, most DIY kits come with lower-grade dyed films that don’t offer the same level of UV protection or heat rejection.
Another critical factor is the risk of costly mistakes. For instance, accidentally damaging rear defroster lines during a DIY attempt can lead to repair bills exceeding $300. Professional services also come with warranties that cover issues like bubbling or peeling – something you won’t get with a DIY job. Beyond the durability and peace of mind, professional tinting spares you the frustration of trial and error.
Fast Installation and Less Hassle
Time is another big advantage of professional tinting. While DIY projects can drag on for hours (or even days), professionals can tint an entire vehicle in just 1 to 3 hours. They achieve this efficiency using specialized tools like digital plotters for precision cutting and heat guns to shrink the film perfectly to curved windows.
Another benefit? Professional shops work in controlled environments free from dust, wind, and temperature fluctuations, ensuring a flawless finish. On the other hand, attempting to tint your car in a driveway or garage exposes the film to debris and inconsistent conditions, which can ruin the end result. For busy car owners, professional services – like those offered at Auto Sound & Security (https://autosoundnyc.com) – make the process quick, stress-free, and polished.
Conclusion
DIY window tinting takes much longer than professional installations. For beginners, a DIY project can stretch to 4–6 hours – or even longer if mistakes happen. On the other hand, professionals can complete the job in just 1 to 4 hours, meaning you can get back on the road much faster.
This time difference highlights an important decision for car owners. If you’re looking to save money and have plenty of time, DIY might be worth considering. It’s also a good option if you enjoy hands-on projects, have a clean, dust-free space, and can dedicate an entire weekend to the task. However, if you’re after a flawless finish, need the job done quickly, or have a newer car, professional tinting is the better choice.
One thing to keep in mind: whether you go DIY or professional, both methods require a 3–5-day curing period during which you’ll need to keep the windows closed. The big difference lies in the installation process. Professionals not only save you time but also deliver quality and durability, sparing you the potential headaches of mistakes or uneven results that can come with DIY efforts.
If you’re a busy car owner who wants top-notch results without the hassle, Auto Sound & Security (https://autosoundnyc.com) offers quick and professional window tinting services. They’ll have you back on the road in just a few hours, not days.
FAQs
What tools do I need to tint windows myself?
To tint your windows at home, you’ll need a few key tools to get the job done right. Start with a spray bottle filled with a soapy solution to help position the film. You’ll also need both hard and soft-edge squeegees to smooth out bubbles and ensure a clean application. Lint-free microfiber towels are essential for wiping surfaces without leaving residue. A heat gun or even a hairdryer can help shrink and set the film, while a utility knife or razor blade is crucial for precise trimming. With these tools, you can achieve a clean, polished finish.
How can I avoid bubbles and dust under the film?
For a smooth, bubble-free window tint application, preparation is key. Start by cleaning the window thoroughly to remove any dirt or debris – this step is crucial to prevent imperfections.
Next, spray the glass with soapy water. This not only makes it easier to adjust the film but also helps reduce the chances of bubbles forming. To further minimize contamination, wet the floor and lightly spray the air before peeling the film. This helps keep dust from settling on the adhesive side of the tint.
By focusing on proper cleaning, using enough soapy water, and handling the film carefully, you can achieve a flawless, professional-looking result.
What should I do during the tint curing period?
During the tint curing process, it’s important to resist the urge to roll down your windows too early. Doing so could lead to peeling or bubbling of the tint. Typically, you’ll need to wait about 3 to 7 days for the tint to fully adhere, though the exact time can vary based on the type of film used and the local climate. To help achieve a flawless finish, keep the windows dry and hold off on washing your car during this period.
We use cookies to ensure that we give you the best experience on our website. If you continue to use this site we will assume that you are happy with it.