Vinyl wrapping your car can save you thousands compared to professional services, but success depends on preparation and the right tools. Here’s what you need to know:
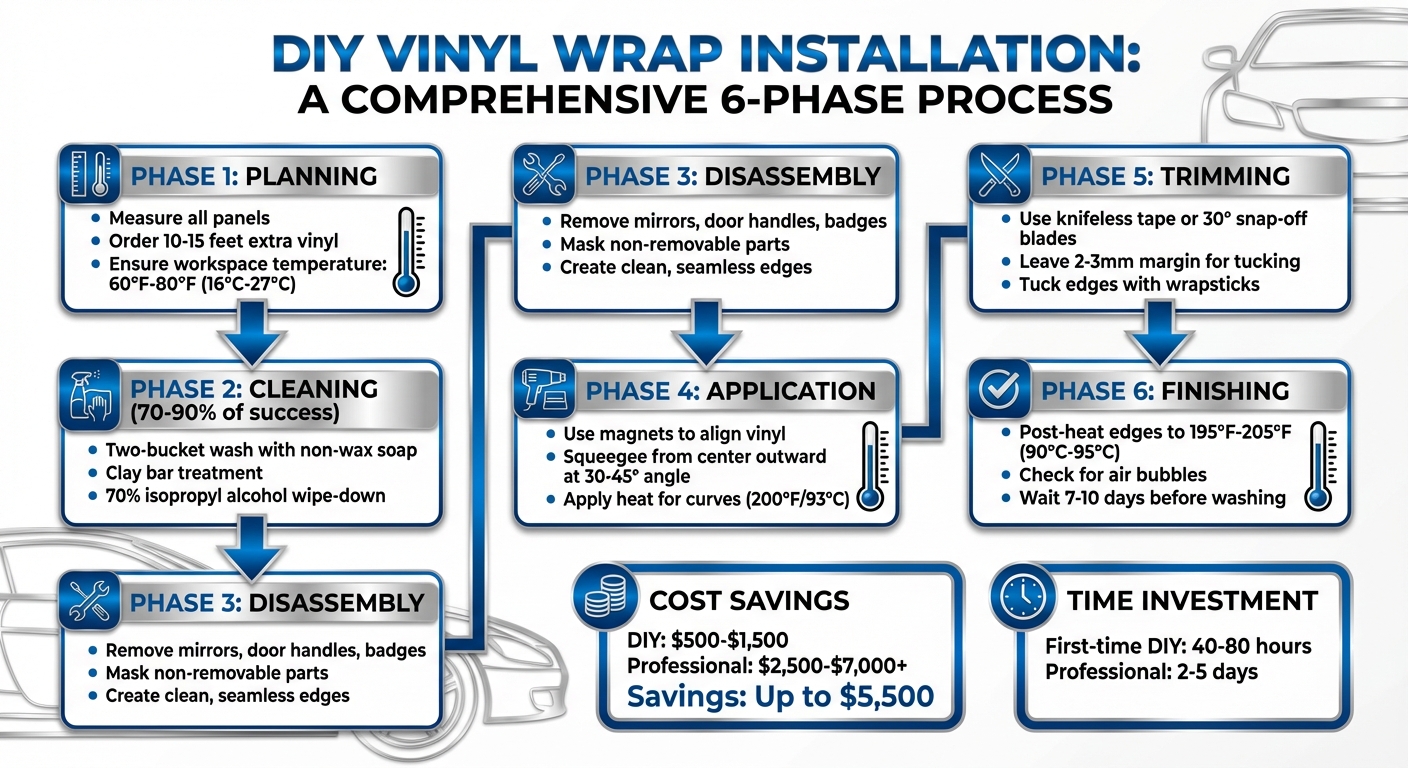
Cost Savings: DIY wraps range from $500–$1,500, while professionals charge $2,500–$7,000+.
Tools Required: Key items include a heat gun, felt-edge squeegee, knifeless tape, precision blades, and microfiber cloths.
Prep Work: Clean thoroughly using soap, a clay bar, and isopropyl alcohol to avoid peeling or bubbles.
Vinyl Choice: Opt for cast vinyl with air-release technology for durability and ease of application.
Application Tips: Work in a temperature-controlled space (60°F–80°F), use magnets for alignment, and post-heat edges to secure the wrap.
Mistakes like skipping surface prep, overstretching vinyl, or cutting directly on paint can ruin your project. If you’re tackling complex areas or high-end vehicles, professional help might be worth considering.
FIRST TIMER’S GUIDE TO VINYL WRAPPING A CAR – Tips & Tricks PART 1
sbb-itb-74b4b25
Tools and Materials You’ll Need
Getting everything ready before diving in can save you time and eliminate those frustrating mid-project store runs. To achieve a professional vinyl wrap, you’ll need materials for surface prep, application tools, cutting instruments, and finishing equipment. Each plays a critical role in the process.
Required Tools
The foundation of a great wrap is surface preparation. Start with a non-wax car soap to clean the vehicle, followed by a clay bar to remove unseen contaminants. Finish with a wipe-down using 70% isopropyl alcohol (IPA) to ensure the surface is spotless. Use separate lint-free microfiber cloths for washing, drying, and applying alcohol to avoid cross-contamination.
For application, a felt-edged squeegee is essential. Choose different firmness levels: soft for initial placement, medium for general use, and firm for tight spots. These will help you avoid scratches on both the vinyl and paint. Clean magnets can also hold large vinyl sheets in place while you align them.
An adjustable heat gun (capable of reaching up to 600°F) is necessary for shaping vinyl around curves and securing edges post-application by heating them to approximately 200°F (93°C). Pair this with an infrared thermometer to ensure you’re hitting the right temperatures. Wrap gloves made from lint-free cotton or anti-static material are great for handling the adhesive side without transferring oils, allowing the vinyl to glide smoothly.
For cutting, 30-degree snap-off precision blades are the go-to for sharp, clean cuts. Replace dull blades immediately to prevent snags. Knifeless tape offers a safe way to create precise cuts by using a filament to slice through the vinyl, avoiding direct contact with your vehicle’s paint. A snitty tool (an enclosed blade) is handy for trimming larger vinyl sections, while an air-release pen can help remove stubborn bubbles without damaging the film.
Once your tools are ready, the next step is choosing the right vinyl wrap film for your project.
Selecting Your Vinyl Wrap Film
Picking the right vinyl wrap film is just as important as having the right tools. Your choice will directly impact how smoothly the application process goes.
For automotive wraps, cast vinyl is the preferred option due to its flexibility and durability. Calendared vinyl, while more affordable, is less flexible and prone to shrinking, making it better for flat surfaces. If you’re new to vinyl wrapping, look for films with air-release technology. These have tiny channels in the adhesive that make it easier to remove bubbles.
To figure out how much material you’ll need, use the formula: (Vehicle Length × 3) + 10 to 15 feet. For example, a standard sedan typically requires 50 to 65 feet of 5-foot-wide vinyl, while larger vehicles like SUVs or trucks might need 70 to 80+ feet. Always order a little extra to avoid running out during the final steps.
Some beginner-friendly options include 3M’s 2080 Series, known for its ease of use and excellent air-release properties, and Avery Dennison’s SW900, which is highly flexible and works well on deep curves. For finishes, gloss wraps replicate the look of paint, while matte wraps offer a sleek, non-reflective appearance.
Preparing Your Vehicle
The lifespan of your vehicle wrap depends heavily on how well you prepare the surface. In fact, improper cleaning is the leading cause of vinyl adhesion problems. If the vinyl sticks to dirt, wax, or grease instead of the paint, you’re almost guaranteed to run into peeling or bubbling issues down the road.
Keep in mind that vinyl is incredibly thin and will highlight any flaws underneath it. Scratches, dents, rust spots, or peeling paint won’t just show – they can also cause the wrap to fail prematurely. Take your time inspecting the vehicle under good lighting. A low-angle flashlight can help expose imperfections. If you spot rust, sand it down gently, treat it with a rust removal spray, and apply primer to the bare metal before moving forward.
Cleaning the Surface
Start by washing the vehicle with a non-wax detergent, like Dawn dish soap (use 1 tablespoon per 2 gallons of water). Rinse thoroughly and let the car dry for 24 hours. Next, use a clay bar with lubricant to remove any stubborn contaminants. Once that’s done, wipe the surface with a 70% isopropyl alcohol solution using the two-cloth method: one microfiber cloth to apply the solution and another clean, dry cloth to wipe it off before it evaporates. Pay extra attention to areas that collect grime, such as wheel wells, fog lights, and door jambs. Wearing lint-free gloves can also help prevent oils from your hands from transferring to the surface.
"If you don’t clean off the dirt and grease from the substrate, what is the vinyl going to stick to? Dirt and grease!" – Rob Ivers, Certification Director, PDAA
Here’s a quick comparison of cleaning methods:
Method
Pros
Cons
Soapy Water (Non-Wax)
Removes heavy mud, dirt, and grime; safe for all surfaces; affordable.
Doesn’t remove wax or grease; can leave residue if not rinsed thoroughly.
Isopropyl Alcohol (IPA)
Strips oils and waxes; evaporates quickly for a clean surface.
Ineffective on heavy dirt; can damage sensitive paint if used in high concentrations.
Once your vehicle is spotless, you’re ready to move on to the next step: removing or masking parts for a seamless application.
Removing Vehicle Parts
For a professional, factory-like finish, remove parts like door handles, side mirrors, emblems, and taillights before wrapping. This allows you to tuck the vinyl behind these components, avoiding visible seams or awkward patches.
For parts that can’t be removed, such as grills or fog lights, use masking tape to protect them and prevent dirt from contaminating the adhesive side of the vinyl. If you’re hesitant about removing certain hardware, knifeless tape is a great tool for creating clean, precise edges while keeping your car’s paint intact. Still, whenever possible, removing parts is the best way to achieve that polished, seamless look.
Applying the Vinyl Wrap
When it comes to applying vinyl wrap, patience and precision are your best friends. Even seasoned professionals approach this task methodically, ensuring the vinyl is laid flat without bubbles or wrinkles.
Measuring and Cutting
Start by measuring each panel carefully. Use blue painter’s tape along the longest edge for accurate measurements, and cut the vinyl with an extra 4–6 inches on all sides. This extra material acts as "handles", making it easier to reposition and ensuring you have enough to tuck the edges properly. It’s always better to have a little extra material to trim later than to run short during installation.
Here’s a quick guide to how much vinyl you’ll typically need:
Once your cuts are ready, you can move on to the installation phase for a smooth and professional look.
Installation Process
Before committing to adhesive, temporarily secure the vinyl using car magnets or painter’s tape to check alignment. For larger panels, having a second pair of hands can be a game-changer. A helper can hold the vinyl taut, creating a "glassing" effect that ensures precise alignment.
Start by anchoring the vinyl at the center to establish a solid baseline. Use a felt-tipped squeegee at a 30–45 degree angle to apply the vinyl, working from the center outward in overlapping strokes. For curves and recessed areas, apply heat to make the vinyl more pliable and easier to conform to the surface. Keep your workspace temperature between 60°F and 80°F (16°C to 27°C) – too cold, and the adhesive won’t bond; too hot, and the vinyl becomes overly soft and difficult to manage.
"Heat sets shape and memory. Use it on purpose, not as a rescue." – DIY Wrap Club
If wrinkles form, don’t panic. Simply lift the vinyl, apply light heat to reset it, and try again. For stubborn air bubbles, a tiny pinprick will let the air escape, allowing you to press the vinyl flat. On stretched areas and edges, heat the vinyl to about 195°F–205°F (90°C–95°C) and check the temperature with an infrared thermometer to ensure accuracy.
Trimming and Final Steps
With the vinyl securely applied, the finishing touches are what make the difference between a good wrap and a flawless one. Careful trimming and edge sealing are essential to ensure the wrap looks polished and lasts over time.
Cutting Away Excess Material
For safe and precise cuts, knifeless tape is your best friend. This adhesive strip contains a filament that slices through the vinyl from underneath, keeping blades away from your car’s paint. It’s especially useful for beginners who might worry about accidentally scratching the clear coat while trimming.
If you need to use a blade, opt for a precision utility knife with 30-degree snap-off blades. These sharper angles provide better control, especially around tight curves. Always use a fresh blade segment for each panel – dull blades can snag or tear the vinyl instead of cutting it cleanly. When trimming around panel gaps, angle the blade slightly away from the finished wrap to avoid unwanted nicks.
Leave a small margin of 2–3 mm when cutting. This excess allows you to tuck the vinyl behind the panel, creating a seamless look. Cutting flush to the edge leaves no material to tuck, which can lead to the vinyl lifting over time. Once the trimming is complete, check that all edges are secure and smooth out any imperfections.
Securing Edges and Inspection
To tuck the excess vinyl neatly, use wrapsticks or other specialized tucking tools. These slim, angled tools are perfect for guiding the vinyl into tight spaces like panel gaps, under weather seals, and around door jambs without overstretching or tearing the material. Avoid using items like credit cards or metal tools, as they can scratch the paint or damage the vinyl.
Post-heating is another crucial step. Apply consistent heat to stretched sections and tucked edges, maintaining a temperature of 195°F–205°F. This process resets the vinyl’s "memory", helping it hold its shape and bond securely. For areas under high stress, such as deep recesses or hood edges, you may need to increase the temperature to 212°F (100°C) for a stronger bond.
Finally, inspect the vehicle for any trapped air bubbles. Small bubbles can be pressed out with your thumb, while stubborn ones may require an air release pen to puncture them discreetly. Apply light heat to smooth the area afterward. For the best results, avoid washing the car or rolling down the windows for 7–10 days to allow the adhesive to fully cure.
Mistakes to Avoid and Pro Tips
Common Mistakes
One of the biggest errors in vinyl wrapping is skipping proper surface preparation. Believe it or not, about 70% of the job’s success depends on how well you prep the surface. If you skip steps like clay barring or degreasing, you’re setting yourself up for issues like bubbles or peeling edges in no time. Always finish the prep process with a wipe-down using 70% isopropyl alcohol to remove any lingering oils or wax.
Another common misstep is over-stretching the vinyl. While quality vinyl has some flexibility – usually stretching up to 30–40% – pushing it beyond that limit can lead to thinning, discoloration, or those dreaded edge fingers. Silas, the founder of Flavor365, offers some wise advice:
"A well-placed seam in a body line is invisible to 99% of people and is a thousand times better than an overstretched, failing piece of vinyl".
If you feel resistance while stretching, stop. It’s better to use an inlay piece than to risk ruining the vinyl.
Heat management is another area where mistakes happen. Too much heat can burn or distort the vinyl, while too little makes it hard to conform to curves. The sweet spot? Keep the surface temperature between 60°F and 80°F. Using an infrared thermometer can help you stay precise – guesswork often leads to errors. And don’t skip post-heating; failing to do so can cause the vinyl to lift over time.
One rookie mistake to avoid is cutting directly on the paint. This can permanently damage your vehicle’s clear coat. As Phil Aquin, a 3M Graphics Application Sales Trainer, notes:
"It’s not the heat gun or heat that wrecks the film: it’s holding the film too tight that leads to overstretching".
Instead, always use knifeless tape to protect your paint. If you encounter issues that are beyond your DIY skills, consider seeking professional help to avoid costly mistakes.
When to Get Professional Help
While avoiding these mistakes is crucial, some challenges are better left to the pros. For instance, modern bumpers with deep channels, intricate aerodynamic details, and complex curves often require professional expertise. If you’re working on a high-end or luxury vehicle, the potential cost of paint damage during trimming might outweigh the savings from a DIY approach. Professional installations, which typically range from $2,500 to $7,000 or more, often include warranties and insurance for added peace of mind.
Other scenarios that call for professional help include intricate designs, custom-printed graphics, or tight deadlines. A first-time DIYer might spend 40–80 hours wrapping a full vehicle, while professionals can complete the same job in just 2–5 days. Plus, if you don’t have access to a dust-free, temperature-controlled workspace, you risk contamination and poor adhesion, which can ruin the final look.
For those tackling complex projects or struggling with a DIY wrap, Auto Sound & Security offers expert vinyl wrap services. Their climate-controlled facility and experienced team ensure a flawless finish, saving you from wasted materials or potential paint damage. Even if you’ve started a project and run into trouble, their professionals can step in to get the job done right.
Conclusion and Quick Reference Checklist
Here’s a streamlined checklist to tie everything together from the guide. By opting for a DIY approach, you can save between $500 and $1,500 in labor costs. However, remember that preparation is key – proper cleaning and prep work contribute 70–90% of the success. Skipping or rushing this step often leads to failure. The "Triple-Clean Method" – a combination of washing, using a clay bar, and wiping down with 70% isopropyl alcohol – is absolutely essential for a solid foundation.
Temperature control is another critical factor. Keep your workspace between 60°F and 80°F to ensure the vinyl performs as it should. After application, use an infrared thermometer to post-heat the edges to about 200°F to secure the wrap.
Investing in good tools is non-negotiable. For example, felt-edge squeegees prevent scratches, knifeless tape protects your paint during cuts, and 30-degree snap-off blades deliver precise, clean edges.
Phase
Key Actions
Planning
Measure all panels; order 10–15 feet extra vinyl; ensure temp is 60°F–80°F.
Cleaning
Perform a two-bucket wash; use a clay bar; finish with a 70% isopropyl alcohol wipe.
Disassembly
Take off mirrors, door handles, and badges for clean, seamless edges.
Application
Use magnets to align; "glass" the panel; squeegee outward from the center; apply heat for curves.
Trimming
Use knifeless tape or sharp 30° blades; leave a 1/8-inch margin for tucking.
Finishing
Post-heat all edges and recesses to about 200°F; check for bubbles.
Aftercare
Wait 48 hours before washing; use only pH-neutral soap for handwashing.
FAQs
What are the biggest mistakes to avoid when doing a DIY vinyl wrap?
When it comes to applying a vinyl wrap, getting the preparation right is absolutely critical. Skipping or rushing this step can lead to issues like poor adhesion, bubbling, or peeling. Start by thoroughly cleaning the surface with isopropyl alcohol to remove any wax, dirt, or debris. A spotless surface is non-negotiable for a smooth application.
Another mistake to avoid is wrapping over damaged areas such as scratches, dents, or rust. Vinyl wraps aren’t a magic fix – they won’t hide imperfections. In fact, these flaws can cause the wrap to lift or peel over time. Always make sure the surface is smooth and free of damage before you begin.
Finally, precise measuring and cutting can make or break your project. Misaligned panels or wasted material often happen when you rush through this step. Take your time to double-check measurements, leave a little extra material for trimming, and work methodically. These small efforts will pay off with a professional-looking finish.
What should I consider when choosing a vinyl wrap for my car?
When picking a vinyl wrap for your car, keep appearance, durability, and ease of installation in mind. Vinyl wraps are available in a range of finishes, including gloss, matte, satin, carbon fiber, and chrome. Choose one that matches your personal style and is specifically designed for vehicles to ensure it fits smoothly over curves and holds up against the weather.
Think about your climate and how you’ll use the car. Some wraps are built to handle prolonged sun exposure and outdoor conditions with better UV resistance, while others focus more on visual appeal. If you’re new to vinyl wrapping or planning a DIY project, opt for materials that are easier to handle. On the other hand, professional-grade options might need an expert touch to achieve a seamless look.
Finding the right wrap is all about balancing your budget, the style you want, and the conditions your car will face. If you’re uncertain, reaching out to a professional or an experienced DIY enthusiast can provide valuable guidance.
Why is it important to control the temperature during a vinyl wrap installation?
Temperature plays a key role in vinyl wrap installation, directly impacting how well the material sticks to the surface. The sweet spot for working with vinyl is between 68°F and 75°F. Staying within this range helps avoid common issues like bubbles, wrinkles, or weak adhesion. Plus, it ensures the wrap lasts longer and looks polished. On the flip side, working in conditions that are too hot or too cold can make the vinyl challenging to handle and compromise the overall outcome.
To schedule an appointment with your friendly neighborhood experts at Car Repair Services, give us a call at +1 718-470-2223 or fill out the form below with your information and requested services. One of our team members will get back to you as soon as possible to confirm your appointment.
mailing list to receive updates on new arrivals, offers and other discount information.
We use cookies to ensure that we give you the best experience on our website. If you continue to use this site we will assume that you are happy with it.Ok