Your car’s suspension settings directly affect how it handles, feels, and performs in different driving scenarios. Here’s what you need to know:
Comfort Mode: Soft damping and lower spring rates prioritize a smoother ride, ideal for city streets and highways.
Sport Mode: Stiffer damping and lower ride height improve handling and stability for spirited driving or track use.
Off-Road Mode: Higher ride height and softer damping provide better grip and ground clearance on rough terrain.
Modern systems like the Polestar 2 Performance Pack or Porsche Active Suspension Management allow you to adjust settings to suit various conditions, enhancing control and safety. To get the most out of your suspension, start with small adjustments, test the results, and consult your vehicle manual for guidance. For advanced tuning, professional help may be necessary to ensure optimal performance and safety.
Rivian Drive Modes, Suspension, & Ride Feel Walk through
sbb-itb-74b4b25
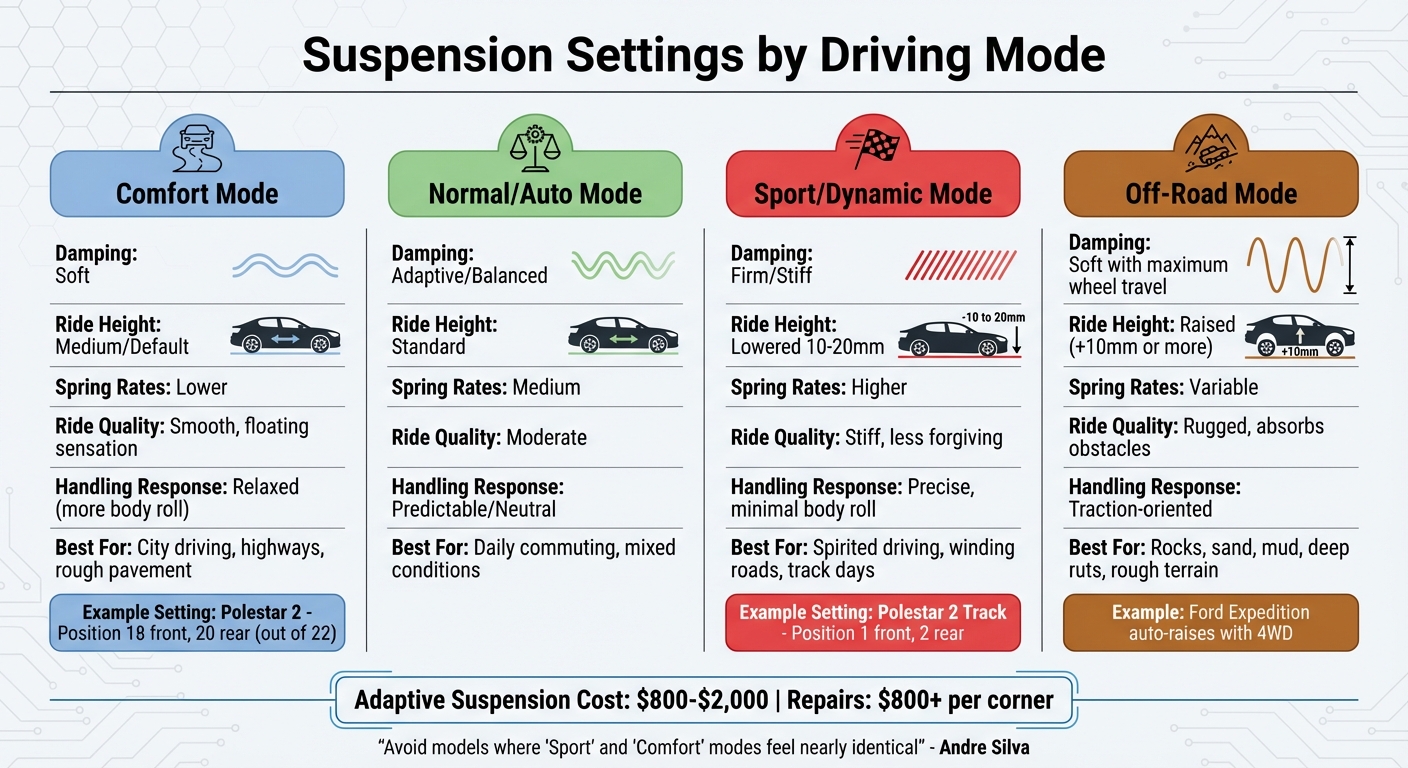
How Suspension Settings Affect Driving Modes
Suspension Settings Comparison Across Driving Modes
Suspension settings play a crucial role in shaping how a vehicle behaves by adjusting damper stiffness (how the shocks compress and rebound) and ride height (the distance between the vehicle and the ground). These adjustments influence performance, safety, and overall driving experience. For instance, stiffer damping reduces wheel travel, keeping the chassis stable during sharp maneuvers, while softer damping absorbs bumps for a smoother ride. Ride height, on the other hand, affects the vehicle’s center of gravity and ground clearance – lowering it enhances stability at high speeds, while raising it protects the undercarriage from obstacles.
"Suspension design is all about compromise. For optimal handling, a car ideally needs to be quite firm, avoiding body roll and pitch… But a stiff setup also makes a vehicle ride harshly on the road." – CarThrottle
Modern adjustable suspension systems allow a single vehicle to adapt to various driving needs. Take the Porsche Active Suspension Management (PASM) system, for example. It offers four modes that independently adjust each wheel’s damping. The "High" setting raises the chassis by 10 mm for off-road use, while "Low" drops it 20 mm for high-speed performance. This flexibility means drivers can fine-tune their vehicle’s setup based on the conditions, avoiding the need for a one-size-fits-all compromise. Below, see how comfort, sport, and off-road modes tweak suspension settings to suit specific driving scenarios.
Comfort Mode: Smooth and Relaxed Rides
Comfort mode is all about prioritizing a smooth ride over sharp handling. It uses softer damping and lower spring rates, allowing the suspension to absorb bumps and potholes with ease. This creates a plush, "floating" sensation often associated with luxury cars.
In air suspension systems, comfort mode typically keeps the ride height at a medium or default level, balancing stability with a cushiony feel. For example, the Polestar 2 Performance Pack recommends setting the suspension to position 18 in the front and position 20 in the rear for comfort – close to the softest end of its 22-position range.
Sport Mode: Precision and Performance
Switching to sport mode transforms the vehicle into a more agile and responsive machine. It increases damping stiffness and often lowers the ride height by 10 mm to 20 mm. This setup reduces body roll during aggressive cornering, keeping the chassis flatter and improving stability at higher speeds.
While this mode delivers sharper steering and better cornering grip, the trade-off is a firmer, less forgiving ride. For the Polestar 2 Performance Pack, the "Track" setting recommends position 1 in the front and position 2 in the rear, offering maximum stiffness (with position 0 being the absolute stiffest). This configuration suits spirited drives on twisty roads or track days where precision is key.
Off-Road Modes: Built for Tough Terrain
Off-road mode adjusts suspension settings to handle rugged terrain. It raises the ride height for better ground clearance and employs soft damping with maximum wheel travel. These changes allow the wheels to move freely over obstacles like rocks or steep inclines without losing contact or bottoming out. The raised chassis also protects the undercarriage from damage.
For example, the Ford Expedition automatically increases its suspension height when four-wheel drive (4WD) is activated, ensuring the vehicle can tackle rough conditions. Off-road setups may also use zero or positive camber angles to enhance tire grip on uneven surfaces, prioritizing traction and obstacle clearance over precise on-road handling.
How to Adjust Suspension Settings for Different Conditions
Fine-tuning your suspension setup can make a significant difference in how your vehicle handles various driving conditions. The key is to make small, incremental changes and test their impact before moving on to the next adjustment.
Step 1: Identify Your Driving Needs
Your driving environment should guide your suspension adjustments. For example:
City driving: Opt for a higher ride height and softer damping to handle potholes and uneven surfaces more comfortably.
Highway cruising: A lower stance combined with firmer damping improves stability at higher speeds.
Off-road adventures: Increased ground clearance and softer damping (about 2-3 inches of wheel travel) allow the suspension to absorb uneven terrain effectively.
Wet or slippery conditions: A slightly higher ride height and neutral camber help maintain tire contact with the road, reducing the risk of hydroplaning.
Tailoring your settings to the terrain ensures better performance and safety.
Step 2: Test Different Suspension Modes
Start by documenting your current suspension setup. As Aaron Lambert from Penske Racing Shocks explains:
"A baseline separates real tuning from a string of guesses. It’s a documented setup that produces consistent behavior and consistent lap-to-lap feedback".
Once you have a baseline, follow the "one change" rule: adjust a single variable at a time and test it on a route you’re familiar with. For adjustable shocks, begin at the midpoint setting and make small changes until the car feels stable without being overly rigid.
Professional driver Randy Pobst highlighted the importance of proper tuning during Mazda Motorsports testing, noting that well-adjusted Penske shocks:
"allowed the tires to maintain more grip because the suspension worked properly, rather than constantly crashing down on the bump rubbers".
This iterative process helps you find the ideal balance for your driving style and conditions.
Step 3: Check Your Vehicle Manual
Your owner’s manual is an essential resource for safe and effective suspension adjustments. It specifies which components can be adjusted by the user and which require professional expertise. For example, it provides torque specifications for suspension bolts – critical to avoid failures caused by under- or over-tightening.
If you change the ride height, a professional wheel alignment is necessary to prevent uneven tire wear and unpredictable handling. Additionally, manufacturers like Polestar emphasize sticking to recommended settings, stating they:
"take no responsibility for the use of non-recommended adjustment positions".
Always stay within the documented adjustment ranges to ensure safety and maintain your vehicle’s performance.
Suspension Settings by Driving Mode: Comparison Table
Table Layout
The table below highlights how suspension settings differ across driving modes, focusing on damper stiffness, ride comfort, handling, and ideal scenarios. These configurations are designed to balance comfort, control, and traction, depending on the driving environment. The comparison makes it easier to determine which mode aligns with your needs.
Mode Name
Damping
Ride Quality
Handling Response
Best Use Cases
Comfort
Soft
Smooth
Relaxed (More body roll)
City driving, highways, rough pavement
Normal/Auto
Adaptive / Balanced
Moderate
Predictable / Neutral
Daily commuting, mixed conditions
Sport/Dynamic
Firm
Stiff
Precise
Spirited driving, winding roads, track
Off-Road
Soft (High Travel)
Rugged
Traction-oriented
Rocks, sand, mud, deep ruts
Andre Silva, a specialist in adaptive suspension systems, offers this practical advice:
"Avoid models where the ‘Sport’ and ‘Comfort’ modes feel nearly identical – this is a common red flag".
The distinctions between modes should be clear enough that you can sense a shift in the vehicle’s performance and character when switching settings.
For those considering adaptive suspension as an upgrade, the cost typically ranges from $800 to $2,000 for the package. However, keep in mind that repairs can be pricey, with replacement costs often exceeding $800 per corner.
Conclusion
Matching your suspension settings to specific driving conditions is crucial for both performance and safety. It’s also an important step in maintaining your vehicle’s longevity. Softer suspension settings are great for absorbing road imperfections and reducing driver fatigue during daily commutes. On the other hand, stiffer setups help minimize body roll and improve handling, especially on winding roads or during spirited driving. The reality is, suspension tuning is always a balancing act – there’s no one-size-fits-all solution.
To get the best results, start with a systematic approach. Begin by establishing a baseline. Record your current ride height, damping settings, and tire pressure. This gives you a reference point to return to if things don’t go as planned. Aaron Lambert, General Manager at Penske Racing Shocks, highlights the importance of this:
"Suspension tuning only works when the process is clean. The most common mistake? Changing things without a reference point".
When you’re ready to make adjustments, focus on one variable at a time – whether it’s compression, rebound, or ride height. Small, incremental changes are key to understanding how each tweak affects your vehicle’s performance.
For more advanced modifications, like internal shock re-valving or shim stack adjustments, it’s best to leave the work to professionals. These changes often require specialized tools, such as tire pyrometers, alignment systems, and shock dynos, which most home garages don’t have. As the staff at American Muscle explains:
"Adjustments to the suspension require knowledge, experience, and the right tools… it’s still important to have a professional check everything before going back on the road due to its huge effect on handling, ride quality, and overall safety".
Properly tuned suspension settings not only improve handling but also prevent issues like bottoming out, maintain tire alignment, and extend tire life – just make sure to rotate your tires every 5,000–7,500 miles. When you’re ready to take things further, Auto Sound & Security can connect you with experts in vehicle modifications and performance upgrades. Their expertise makes them a great partner to help you fine-tune your suspension setup for peak performance.
FAQs
How do I know if my suspension is too stiff or too soft?
If your suspension feels harsh, jarring, or overly rough when driving over bumps, it might be too stiff. On the flip side, a suspension that’s too soft can lead to noticeable body roll, poor handling, or even the vehicle bottoming out on uneven terrain. The key is finding the right balance – this ensures a smooth ride, reliable handling, and consistent tire contact with the road. Adjustments like upgrading shock absorbers or tweaking anti-roll bars can help fine-tune this balance for better performance.
Do I need an alignment after changing ride height?
When you adjust your car’s ride height – like lowering it – getting an alignment is a smart move. Why? It helps maintain the correct suspension geometry, ensures your tires wear evenly, and keeps handling smooth and predictable. Skipping an alignment could result in uneven tire wear and a noticeable drop in how well your car performs on the road.
What’s the safest way to start tuning adjustable dampers?
To get started, establish a solid baseline and make small, step-by-step adjustments. First, loosen all dual-rate nuts to ensure they’re not in contact. Then, set the ride height within the suggested range to avoid any potential damage. When adjusting rebound damping, do it gradually and test the vehicle’s handling after each tweak. Always make these changes in a safe, controlled setting, keep a record of your settings, and ensure the shocks don’t fully compress or extend to prevent damage.
We use cookies to ensure that we give you the best experience on our website. If you continue to use this site we will assume that you are happy with it.