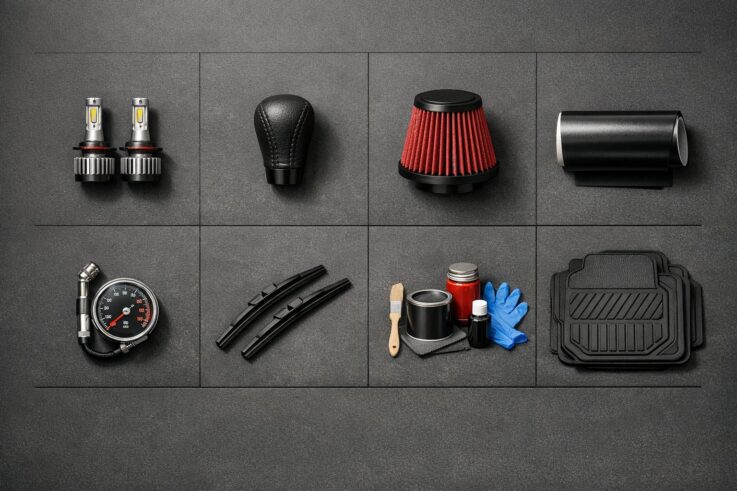
Transform your car without spending a fortune. Here’s a list of 10 affordable car modifications, each costing $300 or less, to upgrade your vehicle’s look, performance, and functionality. Many of these are DIY-friendly and can be installed with basic tools, saving you even more money.
Quick List of Mods:
Interior LED Lighting ($15–$40): Add vibrant, energy-efficient lighting to your car’s interior.
K&N Air Filters ($40–$80): Improve engine airflow and save on long-term filter replacements.
Cold Air Intake Systems ($150–$250): Boost horsepower and throttle response.
Trunk Spoilers & Front Lip Kits ($20–$300): Enhance style and stability at high speeds.
Car Seat Covers ($30–$80): Protect your upholstery and refresh your interior.
Exhaust Tips (Under $100): Upgrade your tailpipe’s look and sound.
LED Fog Lights ($15–$100): Increase visibility and safety in poor weather.
Car Sun Shades ($6–$20): Keep your interior cool and prevent UV damage.
Reverse Parking Sensors ($20–$100): Avoid parking mishaps with obstacle detection.
Car Wraps & Vinyl Decals ($20–$6,000): Customize your car’s appearance while protecting the paint.
These mods cater to various needs, from performance boosts to aesthetic upgrades, and most can be installed in under two hours. Whether you’re looking to personalize your car or improve its functionality, these budget-friendly ideas offer plenty of options.
10 Affordable Car Modifications Comparison: Cost, Difficulty & Benefits
1. Interior LED Lighting Systems
Cost Effectiveness
Interior LED lighting kits pack a punch when it comes to upgrading your car’s look without breaking the bank. Most kits fall between $15 and $40, with options like the Govee Smart Interior Lights starting at just $20. For slightly more, you can grab the LEDGlow 4pc 7 Color LED Kit for about $35. Beyond their affordable pricing, these lights are highly energy-efficient, consuming far less power than traditional factory-installed bulbs. Plus, they’re built to last – many models boast lifespans of up to 50,000 hours. Since they’re designed for easy installation, you can also skip the cost of professional help, making them an even smarter choice.
Ease of Installation
If you enjoy tackling DIY projects, installing interior LED lighting is a simple and satisfying upgrade. Most kits can be fully set up in roughly 30 minutes, and you don’t need any advanced wiring skills to get the job done. For a secure fit, clean the application area with isopropyl alcohol to remove dirt or grease that could interfere with the adhesive. To keep things tidy, use zip ties to secure any loose wires and prevent them from getting in the way.
Aesthetic and Functional Benefits
Switching to LED lighting transforms your car’s interior into a sleek, modern space. These systems replace dull halogen bulbs with vibrant LEDs, offering over 16 million color options and more than 200 preset modes to match your mood or style. Some kits even include "Music Sync" features, where the lights pulse in rhythm with your car’s audio system, creating an immersive experience. Beyond aesthetics, LEDs provide brighter and more consistent illumination, making it easier to see inside your vehicle. They also activate faster than traditional bulbs, adding a touch of functionality to their visual appeal.
Durability and Longevity
LED lighting systems are built to last. With lifespans reaching up to 50,000 hours, they often outlive the cars they’re installed in. They also produce less heat than standard bulbs, which helps protect nearby materials and prevents overheating. However, not all kits are created equal – some budget-friendly options may use weaker adhesives, and a few users have reported occasional issues with smart connectivity features. Before purchasing, it’s also a good idea to check local regulations regarding color restrictions for interior lighting.
For a high-quality selection of interior LED lighting kits, check out Auto Sound & Security to elevate your driving experience.
sbb-itb-74b4b25
The 7 BEST Car Mods Under $100
2. K&N Air Filters
If you’re a car enthusiast looking for a performance boost without recurring costs, K&N air filters might be exactly what you need.
Cost Effectiveness
K&N air filters range from $40 to $80, which is higher than the cost of disposable paper filters. But here’s the kicker: you’ll never need to buy another air filter again. While paper filters typically need replacing every 10,000–15,000 miles, K&N filters are made from washable cotton gauze, meaning they can be cleaned and reused indefinitely. In fact, you’ll only need to clean them every 50,000 to 75,000 miles. Over time, they pay for themselves – usually within about 100,000 miles. With a lifespan designed to last up to 1,000,000 miles, the long-term savings are hard to ignore.
Ease of Installation
Installing a K&N air filter is about as straightforward as it gets when it comes to car mods. These "drop-in" filters are designed to fit directly into your car’s factory air box – no special tools or modifications required. Most people can complete the installation in under 15 minutes. Just pop open the air box, remove the old paper filter, drop in the K&N filter, and close it up. When it’s time to clean the filter, you’ll need a cleaning kit with cleaner and oil. Avoid using pressure washers or compressed air, as these can damage the cotton media.
Functional Benefits
K&N air filters deliver up to 50% more airflow than traditional paper filters, thanks to their multi-layered oiled cotton gauze design. This increased airflow can add 1–5 horsepower and improve throttle response, giving your car a noticeable performance edge. The oiled cotton fibers capture contaminants through a process called diffusion, which traps even tiny particles without restricting airflow. Unlike paper filters that clog on the surface, K&N’s depth-loading design traps dirt throughout the entire filter, allowing air to flow freely even as debris accumulates. Bonus: many drivers report a more aggressive engine sound during acceleration, which adds to the experience.
Durability and Longevity
Built to last longer than most vehicles, K&N filters come with a 10-Year/Million Mile Limited Warranty and are designed for repeated cleanings without losing effectiveness. With cleaning required only every 50,000 to 75,000 miles, they’re a low-maintenance option. However, it’s crucial to follow the oiling instructions carefully – too much oil can contaminate your Mass Airflow (MAF) sensor and hurt engine performance. This durability makes K&N filters a smart upgrade for anyone looking to improve performance while cutting long-term costs.
3. Cold Air Intake Systems
A cold air intake system swaps out your factory airbox for high-flow tubing designed to pull in cooler, denser air. Cooler air packs more oxygen, which helps your engine burn fuel more efficiently. This upgrade can add anywhere from 5 to 20 horsepower to most vehicles . As Ron P from Vivid Racing puts it:
Pound-for-pound (or dollar-for-dollar, if that’s your thing), few upgrades hit harder than a cold air intake.
And the best part? This performance boost comes at a price that won’t break the bank.
Cost Effectiveness
For those on a budget, brands like Spectre offer systems priced between $150 and $250. Mid-range kits typically cost $338 to $475, while premium carbon fiber options can go up to $900 . Most drivers find the mid-range options deliver excellent value. Many systems feature washable, reusable filters backed by warranties of 10 years or 1 million miles – saving you from constantly replacing stock paper filters . Some drivers even report fuel economy gains of 2 to 5 miles per gallon, adding another layer of savings.
Ease of Installation
Installing a cold air intake is a simple, straightforward process. These are true bolt-on upgrades and typically take about an hour to install using basic tools like a socket set, wrenches, pliers, and screwdrivers . The process involves removing the factory airbox, swapping out the old intake tube, and bolting in the new components using existing mounting points. Be cautious with the MAF sensor during installation. If you’re in California or another state with strict emissions regulations, make sure your chosen kit is CARB-compliant before buying .
Aesthetic and Functional Benefits
Beyond performance, cold air intakes bring a deeper, throatier engine sound and a distinct intake noise when accelerating . Unlike the ribbed plastic pipes found in stock setups, smooth metal or polyethylene tubes reduce turbulence and heat soak, leading to better throttle response. Your engine will rev faster and feel more responsive . For optimal results, look for kits that include heat shields to block hot air from the engine bay, as this can cancel out performance gains.
Durability and Longevity
Top-tier filters from brands like K&N or S&B do a better job of blocking debris than standard paper filters, all while maintaining excellent airflow. Under typical highway conditions, these performance filters can last up to 100,000 miles between cleanings – far outlasting the maintenance intervals for standard drop-in filters. S&B systems, in particular, use silicone components capable of withstanding temperatures up to 400°F, ensuring they hold up under tough conditions. For added convenience, keep your factory components on hand for an easy reversion if needed.
4. Trunk Spoilers and Front Lip Kits
Trunk spoilers and front lip kits are affordable upgrades that pack a punch in both style and function. They give your car a bold, aggressive look while improving high-speed stability and offering bumper protection. Plus, they might even increase your vehicle’s resale value by as much as 15%.
Cost Effectiveness
If you’re watching your budget, there are plenty of options to choose from. Universal EZ Lip kits start as low as $39.99, and DIY alternatives can cost around $20. For those seeking a more polished look, professional ABS plastic lips range between $150 and $300, while trunk spoilers typically cost about $100. Considering their potential to boost resale value, these mods are a smart investment.
Ease of Installation
These upgrades are beginner-friendly, with many requiring just basic tools. Universal soft lips often come with peel-and-stick designs using automotive-grade tape, so there’s no need for drilling. For the best results, clean the bumper with isopropyl alcohol and use heat to activate the adhesive. On the other hand, rigid materials like ABS plastic or carbon fiber might need a bit more effort, including tools like jacks, drills, and self-tapping screws. Always do a test fit using masking tape before making the installation permanent.
Aesthetic and Functional Benefits
Beyond the sleek, supercar-inspired appearance, these mods offer practical benefits. Front lip kits help manage airflow at high speeds, reducing lift and protecting your bumper from damage. They also act as a "sacrificial barrier", absorbing impacts before they reach more critical parts of your vehicle. For instance, one Audi R8 owner shared how a $40 EZ Lip held up during 18 months of mountain driving in Southwestern Virginia, effectively protecting the car from repeated impacts.
Durability and Longevity
The material you choose plays a big role in how long these mods last. Flexible materials like synthetic rubber or foam rubber are great for daily driving since they can bend on impact. Rigid options, such as fiberglass or carbon fiber, look stunning but are more prone to cracking if they hit curbs or bumps. As All-Fit Automotive explains:
A hard lip spoiler… is very impractical on a WRX. Hard lip spoilers provide no protection. In fact, they can be quite fragile.
For most drivers, polyurethane or synthetic rubber is the way to go. They balance durability and flexibility, making them ideal for everyday use. Meanwhile, carbon fiber is best suited for show cars or vehicles with higher ground clearance.
5. Car Seat Covers
Car seat covers do more than just protect your upholstery from UV rays, spills, and pet hair – they can also give your car’s interior a fresh look. With prices ranging from $30 to $80, they’re a budget-friendly alternative to professional reupholstery, which can cost anywhere between $500 and $2,000. That’s a savings of up to 90% on restoration costs! Let’s dive into why these covers are a smart investment.
Cost Effectiveness
For as little as $30 to $80, universal seat covers can shield your seats and even enhance your car’s resale value by 5–15%. Compare that to professional reupholstery, which starts at $500 and can climb into the thousands. If you’re a DIY enthusiast, materials like faux leather vinyl cost about $8–$12 per yard, and marine-grade canvas is available for $10–$15 per yard. A small expense can go a long way in protecting your car’s interior and your wallet.
Ease of Installation
Most affordable seat covers are designed for easy, tool-free installation. They come equipped with elastic straps, hooks, and form-fitting hems, making the process straightforward. It typically takes 15 to 60 minutes to install them. The steps are simple: remove the headrests, clean the seats, position the cover, tuck in any extra fabric, and secure the straps. A pro tip? Use a hairdryer to warm the covers slightly before installation. This softens the material, making it easier to stretch and achieve a smooth, wrinkle-free look.
Aesthetic and Functional Benefits
Seat covers don’t just look good – they’re practical too. For instance, neoprene covers are water-resistant and often come with memory foam padding for added comfort. Faux leather offers a sleek, high-end appearance and is easy to clean. If you’re dealing with hot weather, mesh covers provide excellent breathability to reduce heat buildup. Some advanced designs even include storage pockets and panels that help regulate temperature.
Durability and Longevity
When made from materials like neoprene, heavy-duty canvas, or faux leather, seat covers can last 2–5 years with proper care. To make them last even longer, rotate the covers between the driver and passenger seats to distribute wear evenly. Cleaning is straightforward: polyester and canvas covers can usually go in the washing machine on a gentle, cold cycle, while neoprene and faux leather should be hand-washed to avoid damage. One crucial feature to look for? Make sure the covers are labeled "airbag compatible" with breakaway seams to ensure side airbags can deploy safely if needed.
6. Exhaust Tips
Exhaust tips are a simple and budget-friendly way to enhance your car’s appearance. For less than $100, you can turn a plain tailpipe into a stylish feature while subtly altering your exhaust sound. As Miles Roan from Modern Day Muffler puts it:
Installing an exhaust tip is one of the simplest and most cost-effective ways to enhance your vehicle’s appearance and sound.
Compared to a full exhaust system, which can set you back hundreds of dollars, exhaust tips provide a noticeable visual upgrade at a fraction of the cost.
Cost Effectiveness
Bolt-on and clamp-on exhaust tips are particularly easy on the wallet since they don’t require professional installation or specialized tools. Quality options are available for under $100. For example, the DC Sports EX-1012B is often highlighted as a "great value-for-money" choice for those looking to add a deeper tone to their exhaust without committing to a full system.
Ease of Installation
Installing an exhaust tip is quick and straightforward, usually taking just 5 to 15 minutes with basic tools. Most clamp-on designs simply slide over your existing tailpipe and are secured with a wrench or socket set. Just make sure the tip’s inlet matches your tailpipe’s diameter (e.g., a 2.5-inch tip for a 2.5-inch pipe). For a hassle-free process, install when the vehicle is cool to avoid burns, and use a penetrating oil like WD-40 if the tip feels tight. After driving for a few weeks, check and tighten the hardware to ensure it stays secure.
Aesthetic and Functional Benefits
Exhaust tips don’t just look good – they’re functional too. They help direct hot gases away from your bumper, reducing the risk of soot buildup and heat damage to nearby plastics. Available in various styles, such as single- or double-wall designs, they also come in finishes like polished chrome, matte black, or burnt blue. Resonated tips, which include internal chambers, can give your exhaust a deeper, throatier tone without significantly increasing the noise level. As Chloe Clougher from SlashGear observes:
If the look and sound is all that you’re after, then there really is no need to break the bank and splash out on a full system, when a quick change of the tip will provide what you’re looking for.
Durability and Longevity
When it comes to longevity, material quality is key. Ceramic-coated tips handle extreme heat and resist discoloration better than standard chrome. Stainless steel tips are another durable option, offering excellent resistance to rust, unlike chrome, which can corrode and may require frequent polishing. To maintain the tip’s appearance, clean it regularly with soapy water and a soft cloth to remove carbon buildup. While clamp-on tips are easy to install and replace, they can loosen over time or be vulnerable to theft. Weld-on tips, though more permanent and theft-resistant, require professional installation.
Exhaust tips combine style, function, and affordability, making them a practical upgrade for car enthusiasts who want to add a touch of personality without spending a fortune.
7. LED Fog Lights
After tackling cost-efficient exhaust upgrades, another smart move is swapping out your fog lights for LEDs. These lights improve both safety and style, especially in challenging weather like fog, rain, or snow – all for under $100. While traditional halogen bulbs only produce 16–24 lumens per watt, LEDs crank out 80–100 lumens per watt, delivering up to 800% more brightness than standard factory-installed bulbs. Plus, they consume just 8 watts compared to the 90 watts used by halogens, putting less strain on your vehicle’s battery and alternator.
Cost Effectiveness
LED fog light kits typically cost between $15 and $100. Sure, they’re pricier upfront than halogen bulbs, which run about $4–$10 each. But LEDs last far longer – between 25,000 and 70,000 hours – while halogens burn out after just 3,600 hours. This means fewer replacements and less hassle over time. As Underground Lighting puts it:
LED fog bulbs’ long lifespan and energy efficiency make them more cost-effective in the long run.
Ease of Installation
Most modern LED fog lights are designed for quick, hassle-free installation. Thanks to their plug-and-play setups, you can usually get them installed in as little as 3 to 20 minutes without needing professional help. Before starting, check your owner’s manual to confirm your vehicle’s bulb type – common sizes include H11, H8, or H16. When handling the bulbs, keep your hands clean to avoid damaging the LED chips. After installation, align the beam properly by parking 25 feet from a wall and adjusting the light so the top of the beam sits about 4 inches below the center of the lens. This ensures you won’t blind oncoming drivers.
Aesthetic and Functional Benefits
LED fog lights don’t just improve visibility; they also enhance your car’s overall look. For a sleek, modern vibe, go with 6000K lights, or choose 3000K for better performance in fog and snow. Some high-end models even come with switchback technology, letting you toggle between white and yellow light depending on the driving conditions. Additionally, their wider beam pattern improves road-edge visibility, helping you spot hazards like potholes or wildlife earlier.
Durability and Longevity
LED fog lights are built to withstand the wear and tear that often damages halogen bulbs. They resist vibrations and shocks, and many models come with IP65 or IP67 waterproof ratings, UV-resistant polycarbonate lenses, and produce 80% less heat than halogens. These features make them tough enough for harsh conditions and extended use. Some premium brands, like Morimoto, even back their products with 10-year limited warranties, while others offer lifetime coverage. Popular options, such as the SEALIGHT H11/H8/H16, boast a 4.5 out of 5-star rating from more than 30,700 Amazon reviews, with users raving about their instant-on performance and easy installation.
8. Car Sun Shades
Car sun shades are a simple and cost-effective way to protect your vehicle’s interior and keep it cool. Basic reflective or dyed shades are priced between $5.99 and $8.99, while premium jumbo shades or specialized anti-glare visors range from $16.99 to $18.99. These prices are a fraction of the cost of window tinting, which can run anywhere from $50 to $150 for a DIY kit or $200 to $400 for professional installation.
Cost Effectiveness
Good-quality sun shades can block up to 99% of UV rays and reduce the cabin temperature by as much as 30°F compared to untreated windows. This level of protection not only keeps your car cooler but also prevents costly damage to dashboards, leather seats, and electronic components. As Car Roar aptly states:
Investing in car sunshades now saves you from expensive repairs later.
By safeguarding your car’s interior, sun shades help maintain its resale value while offering immediate comfort benefits.
Ease of Installation
One of the best things about sun shades is how easy they are to install. Windshield models can be set up in seconds, while full-window kits take around 10–15 minutes to put in place. Most shades attach securely with suction cups or are simply tucked behind sun visors – no tools required. For the best results, position the reflective side outward to deflect heat, and always clean your windows beforehand for better adhesion. Custom-fit shades outperform universal options because they cover the entire window, leaving no gaps for sunlight to sneak through.
Aesthetic and Functional Benefits
Sun shades do more than just keep your car cool. They also provide added privacy, reduce glare, and improve visibility while driving. With options for windshields, side windows, and even sunroofs, you can find shades that match your vehicle’s design and your personal taste. Some advanced models feature a "double bubble" design, which offers extra insulation and minimizes heat buildup even further.
Durability and Longevity
Premium sun shades are built to last, often made from durable materials like nylon or solar mesh fabric that resist fading and fraying under intense sunlight. Retractable models, such as those from SEINECA and ECFAC, undergo rigorous testing – some are rated to handle up to 50,000 cycles. Unlike metallic tints, these shades won’t interfere with GPS, cell phone, or toll signals. To keep them in good condition, dry any damp shades and store collapsible ones in their travel bags when not in use. SEINECA and ECFAC models, in particular, have earned high marks, with a 9.8/10 CPR score based on reviews of more than 1,400 products.
9. Reverse Parking Sensors
Reverse parking sensors are a practical upgrade that adds extra functionality to your vehicle without breaking the bank. Aftermarket kits are priced between $20 and $100, offering a range of features that help detect obstacles within 1 to 6.5 feet behind your car. These systems alert you with audible beeps or visual cues, making them a valuable addition, especially when you consider that over 60,000 people are injured and 500 are killed annually in parking lot accidents.
Cost Effectiveness
Beyond their affordable price, reverse parking sensors can save you money by helping avoid minor collisions that might otherwise lead to costly repairs or insurance claims. Some insurers even provide discounts for vehicles equipped with these systems. For instance, the CISBO Parking Sensor Kit – rated 9.8/10 and praised by over 500 reviewers – delivers great value in the mid-range category. On the higher end, the Valeo Beep&Park system, rated 9.6/10, includes advanced features like self-diagnosis, which alerts you if a sensor malfunctions.
Ease of Installation
The ease of installation largely depends on the type of system you choose. Wireless models that attach to your license plate are straightforward and require no drilling, making them a hassle-free option. On the other hand, hardwired systems are more reliable but require drilling 21mm holes and splicing wires. Before securing the sensors, test each one to ensure proper functionality. For best results, mount sensors between 19 and 31 inches from the ground – placing them too high could cause them to miss smaller obstacles like curbs. If you’d rather leave it to a professional, installation labor typically costs between $61 and $90.
Functional Benefits
Using ultrasonic or electromagnetic technology, these sensors detect obstacles in your vehicle’s blind spots. As automotive journalist Nick Kurczewski explains:
Parking sensors positioned at the front or rear of the vehicle help to avoid an embarrassing, not to mention expensive, bumper-bashing accident.
The system provides real-time alerts that intensify as you approach an obstacle, with some advanced models emitting a continuous alarm when you’re closer than 12 inches. This feature is particularly useful for spotting small children or fast-moving pedestrians that mirrors might miss.
Durability and Longevity
High-quality sensors are built to endure constant exposure to outdoor conditions. Look for models with an IP-67 waterproof rating to ensure reliable performance in rain or during car washes. Regularly cleaning the sensors helps prevent dirt buildup and false alarms. For example, the AUTOUTLET Rear Kit – rated 9.6/10 and backed by over 2,050 reviews – features a three-color LED distance indicator and has proven its durability time and again. Many modern kits also include self-check features that monitor sensor health, ensuring they remain dependable over time. These durable systems are a smart addition to your vehicle and pair well with other cost-effective upgrades.
10. Car Wraps and Vinyl Decals
Car wraps and vinyl decals are a game-changer for vehicle customization. They let you completely transform your car’s look without committing to permanent changes. Plus, they’re a much more budget-friendly option compared to traditional paint jobs, which can cost 30% to 50% more than wrapping. On top of their aesthetic appeal, vinyl wraps also protect your car’s original paint, making them a smart choice for anyone looking to personalize their ride.
Cost Effectiveness
If you’re handy and willing to take on a DIY project, a full wrap can cost anywhere from $700 to $1,500. For professional installations, expect to pay between $2,000 and $6,000. Not ready to commit to a full wrap? Partial wraps, like accent modifications, are a great way to enhance your car’s look while protecting the original paint – and they’re easier on the wallet. In fact, 70% of customers report feeling like their car is completely transformed with just simple accent upgrades. Beyond looks, wraps shield your car from UV rays, road salt, and minor scratches, all while helping to maintain resale value.
Ease of Installation
Thanks to modern air-release technology, vinyl wraps are easier than ever to install yourself. This technology prevents bubbles during application, making DIY projects more approachable. Small-scale projects, like wrapping mirror covers or pillar posts, can be done in just a few hours with basic tools. To get started, prep the surface by cleaning it thoroughly with rubbing alcohol or a specialized solution – any dirt or wax can cause the vinyl to fail. For beginners, it’s smart to buy 10% to 15% extra vinyl to account for mistakes. And don’t forget an infrared thermometer to ensure the vinyl reaches the optimal temperature for proper adhesion.
Aesthetic and Functional Benefits
One of the biggest perks of vinyl wraps is their versatility. You can choose from designs like carbon fiber patterns or color-shifting effects – options that traditional paint simply can’t replicate. Plus, wraps are completely reversible, so you can return to the original factory paint anytime without causing damage. Beyond the visual appeal, wraps act as a protective barrier, safeguarding your paint from environmental wear and tear. For professional results, companies like Auto Sound & Security provide expert vinyl wrap services, ensuring your car looks great and stays protected.
Durability and Longevity
High-quality vinyl wraps are built to last. They typically hold up for 3 to 7 years, and if your car is mostly parked in a garage, they can last up to 10 years. To keep your wrap in top shape, hand wash it with a pH-neutral shampoo and avoid high-pressure washes over 2,000 PSI. Cleaning off contaminants quickly and parking in shaded areas can also extend its lifespan.
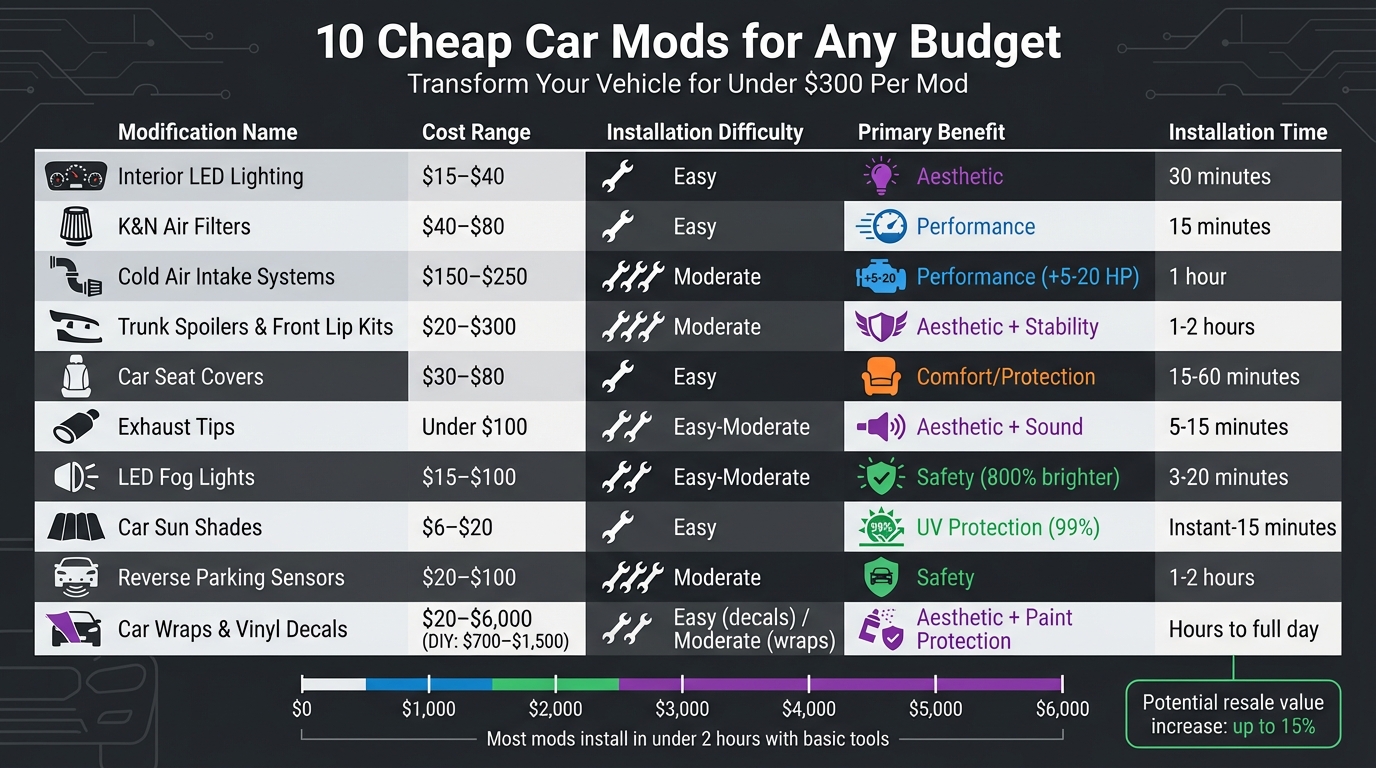
Comparison Table
Here’s a quick summary of 10 popular car modifications, breaking down their costs, installation difficulty, and key benefits to help you decide which upgrades suit your needs.
Modification
Estimated Cost
Difficulty Level
Primary Benefit
Interior LED Lighting
$15 – $40
Easy
Aesthetic
K&N Air Filters
$25 – $95
Easy
Performance
Cold Air Intake Systems
$40 – $165
Moderate
Performance
Trunk Spoilers / Front Lip Kits
$45 – $75+
Moderate
Aesthetic
Car Seat Covers
$30 – $80
Easy
Comfort / Aesthetic
Exhaust Tips
$125 – $630
Moderate
Performance / Aesthetic
LED Fog Lights
$25 – $125
Easy to Moderate
Safety / Aesthetic
Car Sun Shades
Basic: $6–$20 / Premium: $17–$40
Easy
Comfort / Aesthetic
Reverse Parking Sensors
$50 – $150
Moderate
Safety
Car Wraps / Vinyl Decals
Decals: $20–$125 / Full Wraps: $700–$6,000
Easy (Decals) / Moderate (Wraps)
Aesthetic
If you’re after performance improvements, options like K&N air filters or cold air intake systems offer noticeable gains without breaking the bank. For a fresh look, consider aesthetic enhancements like interior LED lighting, trunk spoilers, or vinyl decals – many of which are easy to install yourself.
For beginners, starting with simpler upgrades like seat covers, LED lighting, or sun shades is a great choice. However, more complex projects – such as exhaust tips or full car wraps – might require a professional touch to ensure a polished finish and compliance with local regulations.
Safety-focused upgrades, including LED fog lights and reverse parking sensors, are practical additions that improve visibility and help reduce the risk of accidents. Meanwhile, comfort mods like car sun shades combine utility with affordability.
For professional help with advanced modifications – like vinyl wraps or window tinting – consider reaching out to trusted services like Auto Sound & Security, known for delivering reliable and high-quality results.
For more details on each modification, revisit the sections above to make an informed choice before diving into your next upgrade.
Conclusion
Upgrading your car doesn’t have to break the bank or require professional expertise. These 10 budget-friendly modifications show how you can enhance your car’s appearance, performance, and safety for under $1,000 – and many of these upgrades cost less than $100 each. From adding LED lighting for a sleek new look to installing a K&N air filter for improved engine efficiency or reverse parking sensors for added safety, these upgrades combine affordability with practicality.
What makes these upgrades even better is how easy they are to install. Most of them only require basic tools and can be completed in under two hours, saving you the expense of professional labor. Some, like vinyl decals, seat covers, and LED bulbs, are even reversible, so you can preserve your car’s resale value. In fact, tasteful modifications can boost resale value by as much as 15%.
"Building the perfect car doesn’t require deep pockets or a particularly equipped garage. In fact, some of the most drastic modifications cost less than a tank of premium petrol." – The Engineering Choice
The real secret to success lies in quality installation. A carefully installed budget mod will always look and perform better than an expensive one done poorly. Start with simple upgrades to build confidence, then move on to more advanced projects as you refine your personal style.
For those ready to take on larger projects like vinyl wraps, window tinting, or integrated lighting, Auto Sound & Security offers professional installation services to ensure a flawless finish. Whether you’re a DIY enthusiast or prefer expert help, these affordable upgrades make personalizing your car easier and more accessible than ever.
FAQs
Which cheap car mods give the biggest real-world improvement?
When it comes to affordable car mods that make a real difference, a few upgrades stand out. Cold air intake systems and upgraded filters are great for improving engine airflow, which can lead to better fuel efficiency and sharper throttle response. These upgrades don’t just enhance performance – they can also make your car feel more responsive on the road.
For those looking to tweak the sound and add a bit of horsepower, performance mufflers and exhaust systems are a solid choice. They give your car a more aggressive tone while offering a slight boost in power.
If safety and handling are your priorities, consider suspension upgrades, sway bars, and brake kits. These mods provide better control, making your car more stable and giving you a more confident driving experience, especially during tight turns or sudden stops.
Will these mods void my warranty or cause a failed emissions test?
Some car modifications, such as altering the exhaust system or engine tuning, can void your warranty or lead to emissions test failures if they interfere with emissions controls or breach warranty terms. On the other hand, cosmetic upgrades or parts designed to be warranty-safe typically don’t cause these issues. To steer clear of complications, make sure your modifications align with local regulations and the manufacturer’s guidelines. For added peace of mind, consult a professional or an authorized dealer to help you select mods that maintain your warranty and comply with emissions standards.
What tools do I need for the easiest DIY installs?
For straightforward DIY car modifications, you’ll usually only need a few basic tools. Essentials include screwdrivers, pliers, and a socket set. If you’re working on something like installing LED lights, having a wrench on hand can come in handy.
For slightly more advanced projects, like applying vinyl wraps or adding a cold air intake, you might need tools like a heat gun or trim removal tools. Don’t worry, though – these tools are easy to find and suitable for beginners.
To schedule an appointment with your friendly neighborhood experts at Car Repair Services, give us a call at +1 718-470-2223 or fill out the form below with your information and requested services. One of our team members will get back to you as soon as possible to confirm your appointment.
mailing list to receive updates on new arrivals, offers and other discount information.
We use cookies to ensure that we give you the best experience on our website. If you continue to use this site we will assume that you are happy with it.Ok