Apple CarPlay isn’t just for new cars – you can add it to almost any vehicle made after 2000. Whether you prefer a quick setup with a portable tablet or a fully integrated head unit replacement, this guide walks you through the process. Here’s the gist:
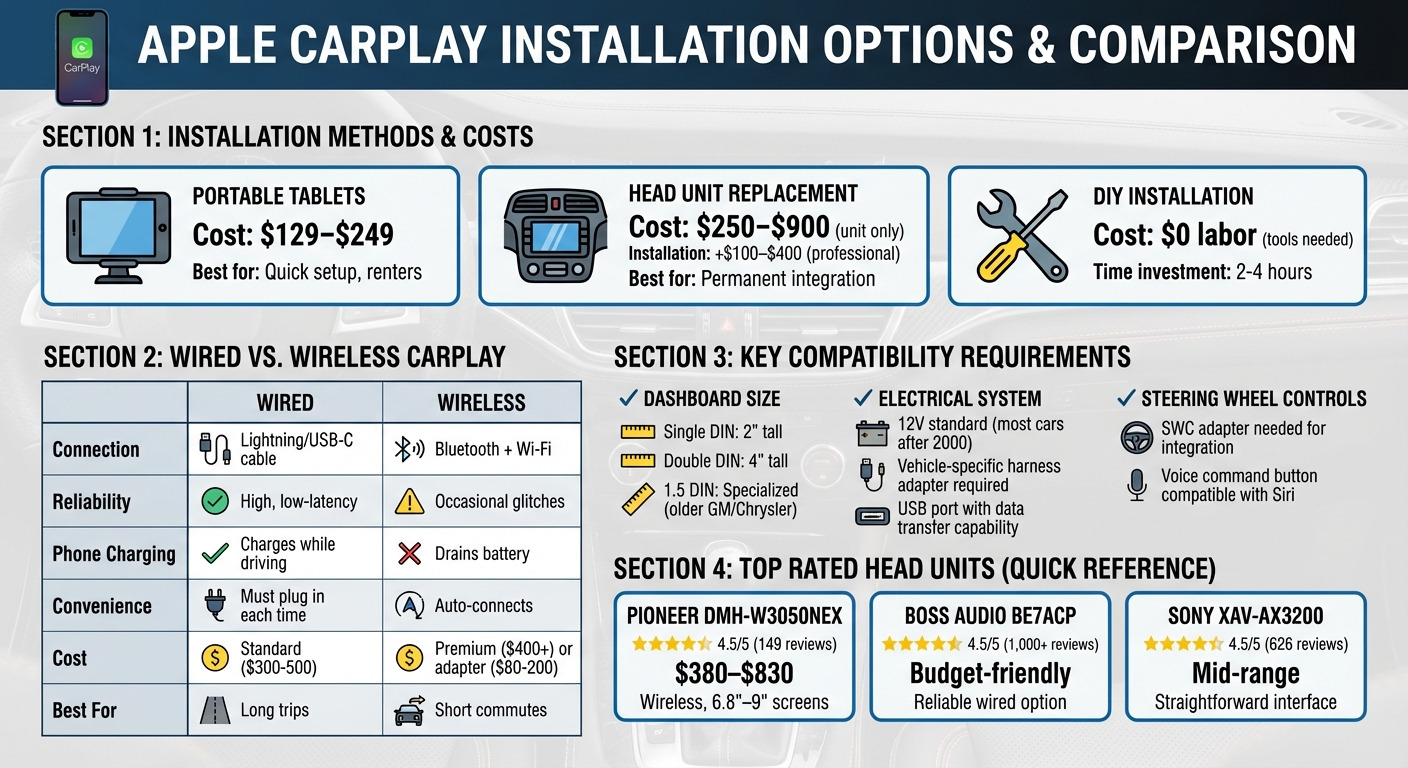
Options and Costs: Portable tablets cost $129–$249, while head unit replacements range from $250–$900 (plus installation fees).
Compatibility: Check your car’s dashboard size, electrical system, and steering wheel controls.
DIY or Pro Install: With the right tools (like trim removal tools, wiring harnesses, and a multimeter), you can do it yourself or hire professionals for $100–$400.
Wired vs. Wireless: Wired systems are reliable and charge your phone, while wireless offers convenience but costs more and may need extra hardware.
For a smoother experience, ensure your car’s setup matches the requirements, and choose a system that fits your needs and budget. Keep reading for step-by-step instructions and troubleshooting tips.
Apple CarPlay Installation Options: Costs, Methods, and Connection Types Compared
Apple CarPlay & Android Auto Head Unit Install
sbb-itb-74b4b25
Checking Your Vehicle’s Compatibility
Before diving into a purchase, you’ll need to confirm three key things: the space available in your dashboard, your car’s electrical system capacity, and whether your steering wheel controls are compatible. While most cars manufactured after 2000 can support CarPlay, the details often depend on your vehicle’s make and model. Take the time to assess these factors to ensure a seamless installation process.
Measuring Dashboard Space
Car stereo units come in two main sizes: Single DIN (about 2 inches tall) and Double DIN (around 4 inches tall). Older vehicles often feature Single DIN slots, while newer models with built-in touchscreens typically accommodate Double DIN systems. Some older GM and Chrysler vehicles, however, use a less common 1.5 DIN size, which may require specialized mounting brackets.
If your car integrates audio and climate controls into the dashboard, you might need a dash kit tailored to your specific vehicle. The easiest way to check which units will fit is by entering your car’s year, make, and model into a fitment database found on most car audio retail websites.
For precise measurement, you may need to remove plastic trim pieces to access the internal mounting brackets and measure the depth behind your factory unit. A plastic trim removal tool is handy for this task, and you might need to look behind ashtrays, switches, or cover plates to locate hidden screws.
Checking Electrical System Requirements
Most vehicles built after 2000 operate on a standard 12V electrical system, which is what aftermarket CarPlay units require. To avoid cutting into factory wiring, use a vehicle-specific harness adapter for clean and reliable connections.
"Most DIY issues happen because of mismatched power or ground wires. Always double-check connections with a multimeter." – James Kim, Certified Installer, MergeScreens
Before starting any electrical work, disconnect your car’s battery to prevent shorts or shocks. Use a digital multimeter to identify wires providing constant 12V power versus ignition-switched power – this is crucial to prevent draining your battery when the car is off. For wired CarPlay setups, you’ll also need a USB port that supports data transfer, not just charging. Look for ports labeled with a smartphone or CarPlay icon.
For wireless CarPlay systems, ensure the head unit supports Bluetooth and includes a dual-band Wi-Fi router. Firmware updates are often necessary to maintain compatibility with newer iOS versions, so check that your head unit supports updates.
Steering Wheel Control Compatibility
If your car has steering wheel controls, they can often be integrated with an aftermarket CarPlay system using a Steering Wheel Control (SWC) adapter. Make sure the head unit or wiring harness you choose explicitly supports SWC functionality.
Cars with a voice command or Siri button on the steering wheel are usually already set up to work with smartphone voice assistants. Many CarPlay systems allow you to use this button to activate Siri for hands-free operation. Once installation is complete, turn the ignition to the accessory position and test the steering wheel buttons to ensure everything works before reassembling the dashboard.
Choosing an Aftermarket Head Unit
Once you’ve confirmed compatibility with your vehicle, the next step is selecting a head unit that aligns with your needs and budget. As of early 2026, there are over 144 aftermarket receivers available that support Apple CarPlay. Focus on the features that are most important to you – this decision will set the stage for a smoother installation process.
Screen size is a key consideration. CarPlay head units typically offer displays ranging from 6.75 to 10.1 inches. Double-DIN units (4 inches tall) can accommodate larger touchscreens, while "floating" displays attach a bigger screen to a Single-DIN (2-inch tall) chassis. However, make sure these "floating" designs won’t obstruct vents or climate controls in your car [20,21]. For a more responsive experience, opt for capacitive touchscreens, which mimic the feel of a smartphone [19,20].
"If a larger stereo (‘double-DIN’) will fit in your car, then consider getting a touchscreen stereo. Touchscreen controls make it easy to adjust the stereo." – Dave D., Car Stereo Expert, Crutchfield
Connectivity type is another important factor. Standard units rely on a USB cable to connect your phone each time you drive, while higher-end models (typically priced at $400 or more) offer wireless CarPlay through a built-in dual-band Wi-Fi router [17,20]. Keep in mind, wireless CarPlay requires more than just Bluetooth – it needs dedicated Wi-Fi hardware. If you’re someone who makes frequent short trips, wireless connectivity can save you the hassle of repeatedly plugging in your phone.
You might also want to consider expandability options. Features like backup camera inputs, multi-band equalizers, and support for high-resolution audio files can enhance your setup [19,20]. For vehicles with limited space, "mechless" units – those without CD or DVD drives – offer a more compact solution.
Works well in shallow dash openings; shares tech with Kenwood at a lower price point
For a highly rated option, the Pioneer DMH-W3050NEX stands out with a 4.5/5 star rating from 149 reviews, praised for its smooth wireless connectivity. If you’re shopping on a budget, the BOSS Audio BE7ACP is a reliable wired option, earning 4.5/5 stars from more than 1,000 reviews. Another solid choice is the Sony XAV-AX3200, which also scores 4.5/5 stars from 626 reviews, noted for its straightforward interface and dependable performance.
Once you’ve chosen your head unit, the next step is to gather the tools and accessories needed for a successful installation.
Tools and Accessories You’ll Need
Before you start taking apart your dashboard, it’s crucial to gather the right tools. The right setup can make all the difference between a smooth, professional job and a frustrating mess. Here’s what you’ll need to get started.
First, invest in panel removal tools, often called "panel poppers." These plastic pry tools are perfect for removing trim pieces without scratching your dashboard or damaging fragile clips. Stay away from metal tools like flathead screwdrivers – they can easily gouge or damage your interior. You’ll also need a set of screwdrivers (both Phillips and flat-blade) and Torx drivers to handle the fasteners holding your factory unit in place. Some Ford models might require specialized internal clasp release tools, so it’s a good idea to check your vehicle’s specific requirements ahead of time.
For the wiring process, a vehicle-specific harness adapter is essential. This adapter connects your new head unit to the factory wiring without the need for cutting or splicing wires. Pair this with a dash kit, which ensures the new head unit fits snugly in your dashboard and stays secure while driving. To connect the head unit’s pigtail to the harness adapter, you’ll want to have wire cutters, a crimping tool, or a soldering iron with solder on hand.
If you’re looking to simplify the wiring process, the Crutchfield ReadyHarness Service offers pre-wired harnesses for $27.99, making it easier to achieve a factory-like connection.
A multimeter or test light is another must-have tool for identifying power and ground wires before making any connections. You can test speaker wires by briefly touching them with a 1.5-volt battery and listening for a static "pop." If your vehicle has steering wheel controls, a CAN-Bus or SWC adapter will help retain those functions. For wired CarPlay setups, always use MFi-certified Lightning cables to avoid connectivity problems.
As for cost, installations typically range from $350 to $1,200, depending on your vehicle and the components you choose. Having the right tools and accessories on hand ensures the job is done right the first time.
Installation Instructions
Now that you have all your tools and accessories ready, it’s time to dive into the installation process. This requires a bit of patience and precision, but with the right steps, you can achieve a clean, professional result. Before you begin, always set the parking brake and ensure your vehicle is in "Park." If you need to start the engine to test the system, make sure you’re in a well-ventilated outdoor area to avoid carbon monoxide exposure.
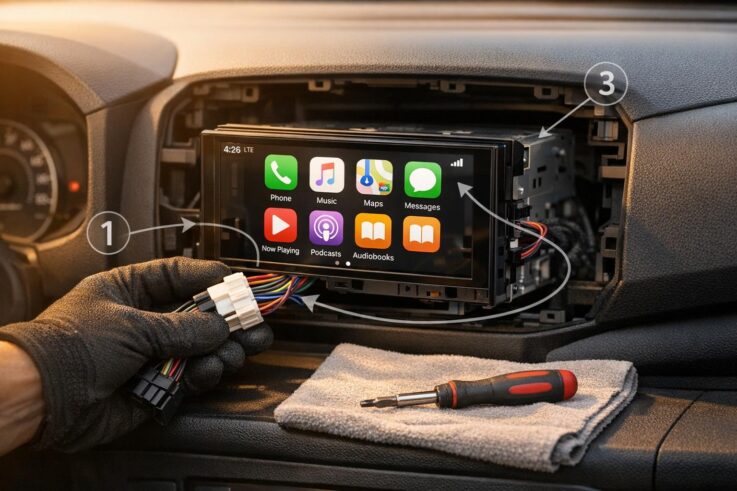
Step 1: Disconnect the Battery and Remove the Factory Stereo
Start by disconnecting the negative battery terminal using a wrench or socket set. This step is crucial for safety – it prevents electrical shorts, blown fuses, or even shocks during the process. Secure the disconnected terminal so it doesn’t accidentally touch the battery post while you’re working. Turn off the ignition and wait a few minutes, as many modern vehicles keep their electronic systems active briefly after the key is removed.
Next, carefully remove the dashboard trim surrounding the factory stereo. Use a plastic trim removal tool to gently pry the panel off to avoid scratches or cracks. Avoid using metal tools, as they can damage the trim. If a panel seems stuck, don’t force it – check for hidden screws behind ashtrays, climate control panels, or small cover plates.
Factory stereos are usually held in place by one of two methods:
Bracket-mounted units: These are the most common and require you to unscrew mounting bolts after removing the trim.
Spring-clip mounted units: Found in many European cars, these require specialized U-shaped "DIN tools" that insert into holes on the radio face. Once inserted, the tools release the clips, allowing you to pull the unit out.
Mounting Type
Found In
Removal Method
Bracket-Mounted
Most vehicles
Unscrew mounting bolts after removing the surrounding trim
Spring-Clip Mounted
European vehicles
Use U-shaped "DIN tools" to release clips and pull out the unit
When removing the stereo, handle any attached wires carefully, especially those connected to climate controls or integrated switches. Pulling too hard could disable your heating or air conditioning. To keep things organized, label all factory wires before unplugging them – this will make reconnecting them to the new wiring harness much easier.
Step 2: Install the Wiring Harness Adapter
The wiring harness adapter simplifies the process by allowing you to connect your new head unit without cutting into the factory wiring. Aftermarket stereos typically follow standard wire color codes, so match the colors from the new head unit’s wiring to the corresponding wires on the adapter. Double-check wire functions with a multimeter to ensure proper connections and avoid issues like battery drain.
Secure the connections using crimp connectors or solder, and then protect them with electrical tape or heat shrink tubing. If your vehicle has steering wheel controls, connect the CAN-Bus adapter to the harness at this stage. Make sure the CAN-Bus adapter cable is firmly seated, as loose connections can cause these controls to malfunction.
For optimal performance, route power and signal cables along opposite sides of the vehicle to avoid electrical interference (like alternator whine). Use zip ties to secure the cables, keeping them clear of the steering column and pedals.
Once all connections are secure, you’re ready to mount the new head unit.
Step 3: Mount the New Head Unit
Before finalizing the installation, briefly reconnect the battery to test the head unit’s power, audio output, and touch functions. Once confirmed, disconnect the battery again, install the dash kit, and secure the head unit using the provided screws.
Step 4: Connect and Test Apple CarPlay
Plug in all harnesses, reconnect the battery, and test the Apple CarPlay functionality. Check features like audio playback, touch responsiveness, Siri voice commands, and steering wheel controls (if applicable). For wired CarPlay, use an MFi-certified Lightning or USB-C cable – non-certified cables often cause connection issues. Your iPhone should prompt you to enable CarPlay, and the head unit display should mirror the CarPlay interface.
To ensure the constant power wire is correctly connected, turn off the ignition and check if the head unit retains its settings and clock. If everything is working as expected, you can proceed to reassemble the dashboard.
Step 5: Reassemble the Dashboard
Reinstall all the trim panels and screws in the reverse order of removal. Double-check that all controls and air vents function properly. Finally, take a test drive to confirm the head unit is securely mounted and that there are no rattles or loose connections.
Wired vs Wireless CarPlay
Once your Apple CarPlay system is installed, the next step is deciding how to connect your iPhone – either with a wired or wireless setup.
Wired CarPlay connects your iPhone directly to the head unit using a Lightning or USB-C cable. This method provides a steady, low-latency connection and keeps your phone charged while driving. As Jeremy Laukkonen, a tech expert at Lifewire, points out:
While wireless charging is popular, a wired connection remains more reliable and ensures your iPhone charges during use.
The downside? You’ll need to plug in your phone every time you start the car, and the cable can clutter your dashboard. If convenience is your priority, you might want to consider going wireless.
Wireless CarPlay removes the need for cables altogether. It pairs with your car via Bluetooth and then switches to Wi-Fi for transferring data. Once set up, it connects automatically when you start your car. However, wireless systems can occasionally experience brief audio glitches or lag, especially if you’re using non-certified adapters. Additionally, wireless connections tend to drain your phone’s battery faster, so investing in a wireless charging pad could be a smart move.
Each option has its strengths. Wired CarPlay is a great choice for long trips, as it keeps your phone charged throughout the drive. On the other hand, wireless CarPlay is perfect for short commutes, offering the convenience of automatic connection without the hassle of cables. Many systems that support both options allow you to start with a USB connection, after which your iPhone will prompt you to enable wireless CarPlay for future use.
As Laukkonen further explains:
Wireless CarPlay usually isn’t added with a firmware update because it requires particular hardware. If your car doesn’t have a dual-band wireless router, no firmware update can change that.
If your current setup only supports wired CarPlay, you can upgrade to wireless functionality with a plug-and-play USB adapter. These adapters typically range in price from $80 to $200. Should you experience issues with wireless CarPlay, such as frequent disconnections, try disabling any active VPNs. Make sure to test your preferred connection method during your final setup to ensure everything runs smoothly.
Troubleshooting Common Problems
After installation, you might encounter issues like no sound, display glitches, or connectivity troubles. Here’s how to address them.
No Sound: First, make sure your head unit is set to the CarPlay input. Adjust the individual volume controls for media, calls, and navigation, as they often operate separately. Next, check the wiring harness adapter – ensure all connections are secure and double-check the speaker wire color codes for accuracy.
Display Problems: Display issues usually stem from power or connection mishaps. If the screen doesn’t turn on, use a digital multimeter to confirm the constant 12V and ignition power connections. Also, inspect for blown fuses. A blank screen when connecting your iPhone might mean you’re using a charging-only USB cable.
"Bad USB cables account for nearly half of all wired CarPlay problems we help fix."
Switch to an MFi-certified data cable and connect it to a USB port capable of data transfer. If the display starts working but other issues remain, it’s time to look into connectivity settings.
Connectivity Failures: For wireless CarPlay, ensure both Bluetooth and Wi‑Fi are active on your iPhone. VPN apps can interfere with connections, especially on iOS 18, where they cause problems in about 30% of cases. If you’re facing persistent issues, try disabling or uninstalling your VPN app. Then, navigate to Settings > General > CarPlay, select your vehicle, tap Forget This Car, and set up the connection again.
If you see a "Device Not Responding" error, force restart your iPhone by pressing Volume Up, Volume Down, and holding the Side button until the Apple logo appears. Also, check that Siri is enabled, as CarPlay relies heavily on it. Go to Settings > Siri & Search and enable both "Listen for ‘Hey Siri’" and "Allow Siri When Locked." Finally, ensure your iPhone has at least 1GB of free storage, as low storage can trigger connection errors.
Professional Installation at Auto Sound & Security
If working with car electrical systems or dismantling your dashboard feels overwhelming, professional help is the way to go. Auto Sound & Security specializes in Apple CarPlay installations and is an authorized dealer for top brands like Pioneer, Kenwood, Alpine, and JVC – names trusted for their seamless iPhone integration. Their expertise guarantees an upgrade that looks and feels like it came straight from the factory.
Professional installers use tools designed to protect your car’s interior, like specialized plastic pry tools, which prevent scratches or other cosmetic damage to your dashboard and panels. They also rely on multimeters to accurately identify electrical connections – distinguishing between switched and constant power sources – to avoid issues like battery drain. This attention to detail ensures your installation is both functional and polished.
At Auto Sound & Security, the team goes a step further by verifying your vehicle’s compatibility and using custom adapters and precise wiring techniques. This approach maintains your factory connections, including steering wheel controls, for a seamless integration.
The cost for this level of professional service is competitive. Standard head unit installations typically range from $100 to $300, while more complex setups involving OEM integration kits can cost between $150 and $400. This price includes expert wiring with soldered and heat-shrinked connections, comprehensive testing of your car’s electrical system, and a clean, factory-like finish that enhances your vehicle’s functionality and aesthetics.
Conclusion
Switching to Apple CarPlay brings a smarter, safer driving experience by seamlessly integrating your iPhone with your vehicle. With features like hands-free communication via Siri, real-time GPS navigation complete with traffic updates, and access to apps like Spotify and WhatsApp, CarPlay keeps you connected without taking your attention off the road. By 2025, over 800 car models will support Apple CarPlay, solidifying its place as a go-to solution for modern, distraction-free driving.
This guide has walked you through the essential steps to upgrade your car with ease. Whether you’re confident in handling the installation yourself or prefer leaving it to professionals, the process is manageable for most vehicles made after 2000. From checking compatibility and gathering tools to wiring and testing, following these instructions ensures a straightforward setup. For those who’d rather leave it to the pros, services like Auto Sound & Security provide expert installation and support.
Beyond convenience, upgrading to CarPlay is an investment in safer driving. It minimizes distractions, modernizes older vehicles, and delivers cutting-edge technology – all without the hefty price tag of a new car.
FAQs
Can I add Apple CarPlay to an older car, even one made before 2000?
Yes, you can add Apple CarPlay to a car built before 2000, provided the stereo system can be swapped out for an aftermarket CarPlay-compatible head unit. However, if your factory stereo also manages features like climate controls, replacing it might cause you to lose access to those functions.
To get started, you’ll need a compatible head unit, appropriate wiring kits, and possibly adapters to ensure everything integrates smoothly with your car. Make sure to double-check that the new system is compatible with your specific vehicle model before diving into the installation process.
What’s the difference between wired and wireless Apple CarPlay?
The main distinction between wired and wireless Apple CarPlay lies in how your iPhone connects to your car’s infotainment system.
Wired CarPlay uses a Lightning cable plugged into the car’s USB port to establish the connection. This method ensures a stable link, faster data transfer, and minimal lag, making it a dependable choice – especially for older vehicles.
Wireless CarPlay, in contrast, connects via Wi-Fi and Bluetooth, eliminating the need for cables. This setup offers a clutter-free and convenient experience but can sometimes encounter minor delays or connectivity hiccups, depending on your car model and surroundings.
If you value a steady connection with no fuss, wired CarPlay is a great option. But if you prefer a hands-free, cable-free setup, wireless CarPlay is the way to go – assuming your car supports it.
How can I make sure my steering wheel controls work with an aftermarket CarPlay system?
To keep your steering wheel controls functional with an aftermarket CarPlay system, it’s important to pick a head unit that specifically supports steering wheel control integration. While many CarPlay-compatible stereos are designed to work with factory controls, you’ll often need an additional adapter or wiring harness to make everything work seamlessly.
When setting up the system, make sure the wiring harness includes connections for steering wheel control signals. In some cases, you may also need an interface module to convert these signals into commands that the new stereo can understand. Carefully following the installation instructions and using the correct components ensures that your steering wheel buttons – like those for adjusting volume, skipping tracks, or activating voice commands – will work as intended.
By choosing the right system and properly configuring all connections, you can maintain the ease and safety of controlling your stereo directly from your steering wheel while enjoying the upgraded CarPlay experience.
To schedule an appointment with your friendly neighborhood experts at Car Repair Services, give us a call at +1 718-470-2223 or fill out the form below with your information and requested services. One of our team members will get back to you as soon as possible to confirm your appointment.
mailing list to receive updates on new arrivals, offers and other discount information.
We use cookies to ensure that we give you the best experience on our website. If you continue to use this site we will assume that you are happy with it.Ok